How to Sterilize Mason Jars in the Oven? Easy, Quick Tips
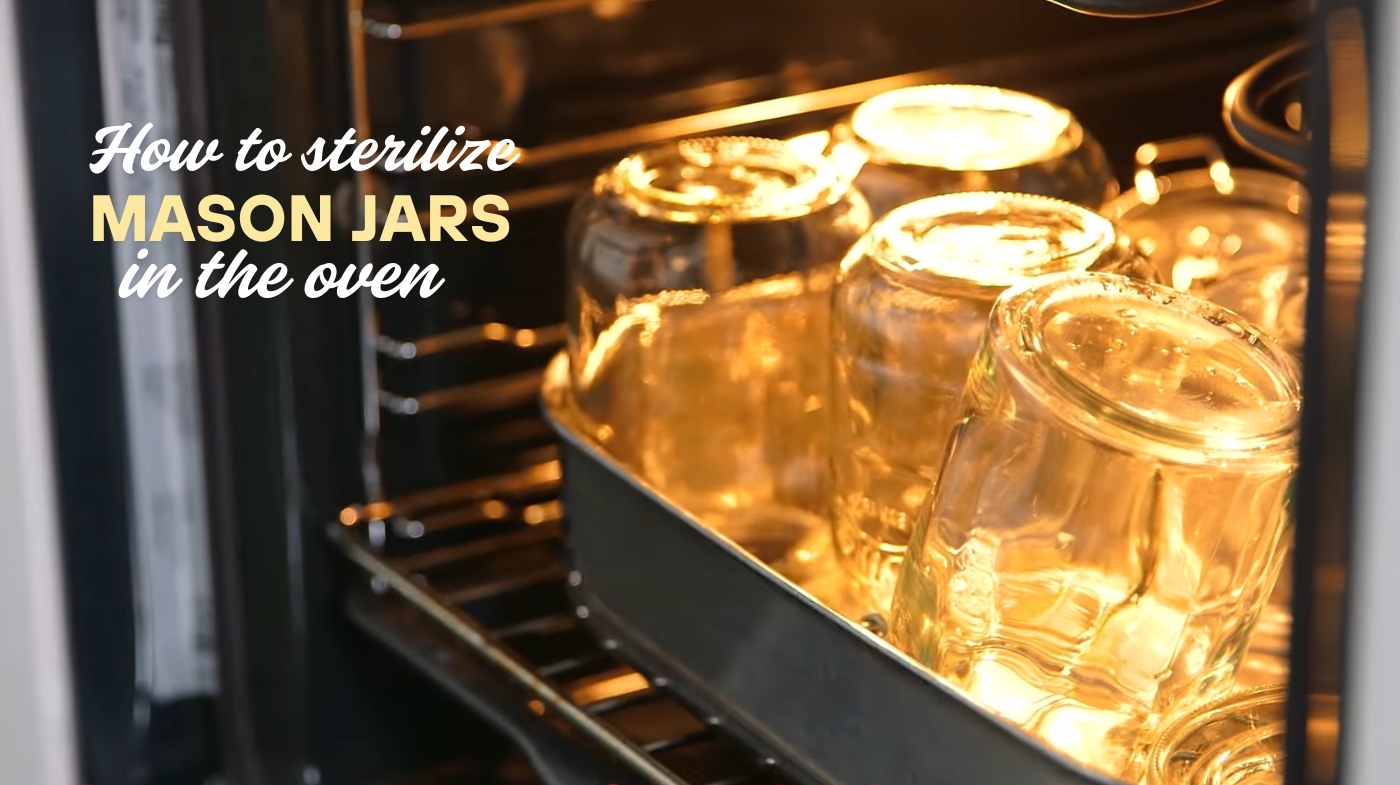
To sterilize mason jars in the oven, start by cleaning them thoroughly with hot, soapy water and checking for defects. Preheat your oven to 225°F to 275°F and arrange jars on a baking sheet without touching.
Place them in the oven for 10 to 15 minutes. Meanwhile, simmer the lids in water for proper sealing. Handle everything with care post-sterilization to avoid contamination. For more insights on safe techniques and tips, keep going.
Key Takeaways
- Preheat the oven to 140°C (275°F) before placing clean jars on baking sheets without touching each other.
- Sterilize jars in the oven for 10 to 15 minutes for effective bacteria elimination.
- Sterilize lids separately in boiling water to prevent damage from dry heat.
- Monitor temperature with a thermometer to ensure consistent heating and avoid thermal shock.
- Handle sterilized jars with oven mitts to prevent burns and re-contamination.
Preparing the Jars for Sterilization
Before you begin sterilizing your mason jars, it’s essential to prepare them properly to guarantee a safe and effective process.
Start by gathering your cleaning supplies: dish detergent, a sponge, hot water, and clean dishcloths. Inspect each jar for cracks or defects and verify they’re free from debris.
Check the lids and bands for signs of wear, particularly the sealing compound. It’s important to note that glass canning jars were first manufactured by Ball Corporation in 1884, making them a reliable choice for food preservation.
Wash the jars with hot soapy water using a clean sponge, then rinse thoroughly to remove all soap residue. Lightly dry the jars or leave them wet for sterilization.
Wash the lids and bands similarly, rinsing them well, and soak the lids in simmering water to soften the sealing compound. Keep everything clean until you’re ready to use them.
The Oven Sterilization Process
To effectively sterilize your mason jars in the oven, start by preheating it to the desired temperature, typically between 140°C and 275°F (57°C to 135°C).
Next, place clean jars on baking sheets, ensuring they don’t touch each other for even heating.
Place clean jars on baking sheets, ensuring they are spaced apart for optimal and even heating.
Once the oven reaches the set temperature, insert the jars and let them sterilize for 10 to 15 minutes. This process kills bacteria and microorganisms, making the jars safe for canning.
Remember that lids should be sterilized separately in boiling water to avoid damage from dry heat. Additionally, the jars should be baked at 250 degrees Fahrenheit to ensure safety against botulism and maintain the material quality crucial for safe food storage.
After sterilization, handle the jars carefully as they’ll be hot, and proceed with filling them promptly to prevent re-contamination.
Safety Considerations for Sterilization
Safety is paramount when sterilizing mason jars, especially using the oven method. You need to be aware of several concerns to guarantee a safe process. Here’s a quick reference table of key safety considerations:
| Consideration | Risk | Recommendation |
|---|---|---|
| Temperature Control | Inconsistent heating | Use a thermometer to monitor |
| Risk of Thermal Shock | Cracking jars | Avoid sudden temperature changes |
| Inadequate Sterilization | Bacterial survival | Follow precise time and temp specs |
| Handling Hot Jars | Burns | Use oven mitts and caution |
| Manufacturer Guidance | Safety concerns | Follow FDA and manufacturer advice |
To ensure the success of your canning process, it is crucial to remember that sterilizing mason jars is a critical step in preventing spoilage during storage.
Comparison With the Boiling Method
When deciding how to sterilize mason jars, comparing the oven method with the boiling method is vital for securing effectiveness and safety.
The boiling method is FDA-approved and considered safer for jars with rubber seals, while oven sterilization allows you to handle more jars simultaneously at temperatures between 250°F to 275°F.
Boiling requires a large pot and guarantees jars are fully submerged, which can be more reliable for assuring sterility.
On the other hand, the oven method is simpler for those lacking specialized equipment and is effective against bacteria like botulism.
Additionally, sterilising jars ensures longer shelf life of homemade preserves. Your choice may depend on your needs, but both methods require diligent preparation and attention to detail for peak results.
Handling Lids and Rings
Although sterilizing mason jar lids and rings may seem straightforward, careful handling is essential to guarantee a secure seal and prevent contamination.
Start by washing the lids and rings in hot, soapy water to remove debris. Rinse them thoroughly with hot water to eliminate any soap residue.
While you can soak them in boiling water for sterilization, be cautious as this may damage the rubber seal. Instead, gentle washing and rinsing often suffice.
It is important to note that oven sterilization methods are not recommended due to the risks of inadequate sterilization. Using metal lids designed for canning provides a tight seal that is crucial for food preservation.
Start by cleaning lids and rings in hot, soapy water, then rinse thoroughly to ensure no soap residue remains.
Once cleaned, place the lids and rings on a clean surface to dry completely. Remember, ensuring cleanliness is vital for preventing contamination.
Store the cleaned lids and rings in a clean environment until you’re ready to use them, maintaining their integrity for a reliable seal.
Post-Sterilization Handling
After sterilizing your mason jars, keep them warm to prevent thermal shock when you fill them with hot contents. Immediately sealing the jars after filling guarantees a proper vacuum seal, which is essential for food preservation.
It’s important to avoid placing hot jars on cold surfaces to prevent cracking, as this can compromise the integrity of the jars.
Keeping Jars Warm
To prevent thermal shock and guarantee a smooth canning process, keeping your sterilized mason jars warm is essential.
After sterilization, avoid letting the jars cool down too much before filling them. You can use a clean towel or oven mitt to keep them warm while you prepare your contents.
If you’re not filling the jars immediately, consider placing them in a low-temperature oven or wrapping them in a towel to retain heat. Confirm that any surface you place them on is clean and dry to prevent contamination.
Filling With Hot Contents
- Always use hot jars for hot food to maintain temperature to ensure the integrity of the jars during the canning process. This is critical for achieving strong suction power when sealing the jars post-filling, as it enhances the preservation of your food.
- Leave the recommended headspace to allow for food expansion.
- Avoid touching the rims to keep them sterile.
As you fill each jar, be certain to remove any air bubbles trapped inside. This helps achieve a vacuum seal, which is imperative for preserving your food safely.
Immediate Sealing Process
Once your jars are filled with hot contents and free of air bubbles, the immediate sealing process begins.
Prepare your lids by having them ready for use, as they don’t require sterilization. Carefully seal each jar tightly to guarantee they’re airtight.
While the screw bands don’t need sterilization since they don’t touch food, make sure they’re clean. After sealing, inspect each jar’s seal to prevent spoilage. It’s important to remember that sterilization is crucial for safe canning, as it helps eliminate harmful bacteria and improves the shelf life of canned goods.
Store your sealed jars in a cool, dark place to maintain quality and safety. Remember, handling the jars with care is essential to avoid contamination.
Tips for Successful Sterilization
While sterilizing Mason jars may seem straightforward, attention to detail can greatly enhance the effectiveness of the process.
Sterilizing Mason jars is simple, but careful attention to detail ensures optimal results.
To ensure successful sterilization, follow these key tips:
- Use the Right Temperature: Keep the oven between 225°F and 275°F to avoid damaging the jars.
- Inspect Your Jars: Before sterilization, check for cracks or defects that could compromise their integrity.
- Prepare Your Work Surface: Verify your work area is clean to prevent cross-contamination when handling jars.
Troubleshooting Common Issues
When sterilizing Mason jars, you might encounter issues like:
Jar Cracking Issues
Jar cracking can be a frustrating issue during the sterilization process, especially if you’re unaware of the common causes. To prevent this, consider these key factors:
- Thermal Shock: Rapid temperature changes can stress the glass. Additionally, storing lids in high humidity areas can also contribute to the risk of cracking.
- Scratches and Chips: Microscopic damage can weaken jars, increasing the risk of breakage.
- Improper Handling: Jars packed too tightly or touching the bottom of a canner may crack. Additionally, using jars specifically designed for canning is crucial to reduce breakage risk.
To avoid issues, preheat your jars, inspect for damage, and use plastic utensils.
Incomplete Sterilization Signs
How can you identify signs of incomplete sterilization in your Mason jars? First, check if the jars feel hot to the touch; if they don’t, they likely haven’t reached the necessary temperatures.
Look for visible residue or water droplets on the jars, as these indicate inadequate sterilization. Relying on the “ping” sound when lids seal isn’t enough; it doesn’t guarantee successful sterilization.
Additionally, if you used low temperatures, such as 225°F, the jars mightn’t have been heated evenly, leaving bacteria alive. Remember, the boiling water method is generally safer and more effective.
Sterilizing jars is not necessary if processing time exceeds 10 minutes, but ensuring complete sterilization is crucial for food safety.
If you notice any of these signs, consider re-sterilizing your jars using a more reliable method to ascertain safety.
Frequently Asked Questions
Can I Reuse Old Mason Jars for Sterilization?
Yes, you can reuse old Mason jars for sterilization, but make certain they’re specifically designed for canning and in good condition. Inspect each jar for cracks or chips, as these defects can compromise safety.
For sterilization, use methods like boiling water or a steam canner, which are proven reliable. Avoid oven sterilization due to temperature inconsistencies. Always verify lids seal properly to prevent contamination during storage or canning.
What Types of Jars Are Suitable for Oven Sterilization?
When considering jars for oven sterilization, you’ll want to focus on specialized glass types, like Pyrex or borosilicate, which can handle higher temperatures.
Regular mason jars, made from soda-lime glass, aren’t suitable due to the risk of thermal shock. Make sure any jar you choose is free from cracks and defects, as damaged jars can break under heat.
How Do I Know if My Jars Are Properly Sterilized?
To know if your jars are properly sterilized, check that they’re hot and free of visible contaminants. Look for no moisture or condensation inside, which indicates effective sterilization.
Handle them carefully to avoid re-contamination, and fill them with food promptly to maintain sterility. Inspect the jars for any damage or defects before use, and confirm your sterilization environment is clean to prevent any contamination risks.
Is It Safe to Use Recycled Jars for Canning?
Yes, it’s safe to use recycled jars for canning, but you need to take precautions. First, inspect the jars for cracks or chips; damaged jars can compromise safety.
Clean them thoroughly in hot soapy water, then sterilize using boiling water or a steam canner. This guarantees harmful bacteria are eliminated.
Can I Sterilize Jars in a Toaster Oven?
You might think a toaster oven could work for sterilizing jars, but it’s not a safe choice. With inconsistent temperature control and limited space, you risk uneven heating. Instead, opt for methods like boiling water or a steam canner, which are proven to be effective and safer.
Sterilize Mason Jars in the Oven Successfully and Preserve with Confidence
In conclusion, sterilizing mason jars in the oven is an efficient, effective method that guarantees your jars are ready for canning. By preparing your jars properly, handling them safely, and following the outlined steps, you can achieve the best results.
Whether you choose the oven method or the boiling approach, remember that consistent practices lead to successful preservation. So, embrace the process, trust your skills, and enjoy the satisfaction of home-canned goodness with confidence.


