Biscoff Dessert Recipe: Easy Steps to Sweet Perfection
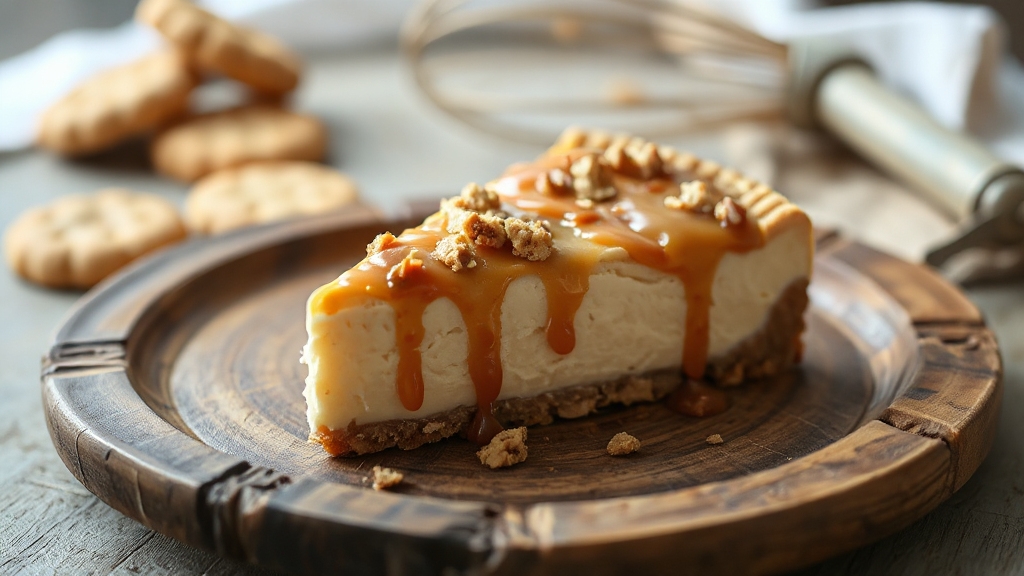
You can whip up a delicious Biscoff dessert by layering crushed Lotus Biscoff cookies with creamy mascarpone or cream cheese mixed with warm Biscoff spread for rich caramel and cinnamon notes.
Start with a crunchy cookie base, add whipped cream for lightness, and alternate layers for a no-bake cheesecake or icebox cake.
Chilling overnight melds flavors beautifully. With the right tools and techniques, you’ll create an indulgent treat that’s as impressive as it is easy—discover tips to perfect your creation.
Key Takeaways
- Use crushed Lotus Biscoff biscuits and cookie butter for a caramel-cinnamon flavor base in your dessert recipes.
- Combine cream cheese, mascarpone, or whipped cream with Biscoff spread for rich, creamy layers or fillings.
- Prepare Biscoff cookie dough by creaming butter and sugar, folding in flour and spices, then chilling before baking.
- Layer soaked Biscoff cookies with mascarpone or whipped cream in a springform pan, then chill overnight for firm texture.
- Decorate with warmed Biscoff cookie butter drizzles, cookie crumbs, or piped frosting for an appealing finish.
Biscoff Dessert Recipe: Quick Prep Table
| Ingredients | Process |
|---|---|
| 2 cups Lotus Biscoff cookies (crushed) | Crush cookies in food processor until fine crumbs form. Reserve some for garnish. |
| 1/2 cup unsalted butter (melted) | Melt butter and mix with crushed cookies to create the base. Press firmly into springform pan. |
| 16 oz cream cheese or mascarpone (room temperature) | Beat cream cheese/mascarpone with electric mixer until smooth and fluffy (2-3 minutes). |
| 1 cup heavy whipping cream (chilled) | In separate bowl, whip chilled cream to stiff peaks. Be careful not to overwhip. |
| 3/4 cup Biscoff cookie butter spread (warmed) | Warm Biscoff spread in microwave for 20-30 seconds until smooth and spreadable. |
| 1/2 cup powdered sugar | Gradually add powdered sugar to cream cheese mixture, beating until combined. |
| 1 tsp vanilla extract | Add vanilla to cream cheese mixture and beat until incorporated. |
| 1/4 tsp cinnamon (optional) | Mix cinnamon into cream cheese mixture for enhanced warmth. |
| Pinch of salt | Add salt to sharpen overall taste and balance sweetness. |
| Strong coffee or espresso (cooled) | Prepare coffee for soaking cookies if making tiramisu variation. |
Ingredients Needed for Biscoff Desserts
When you start crafting Biscoff desserts, the ingredients you choose play an essential role in capturing that signature caramelized, spiced flavor and creamy texture.
Lotus Biscoff biscuits and their cookie butter spread form the foundation, providing caramelized sugar and cinnamon notes. Crushed biscuits create a crunchy base, while creamy elements like full-fat cream cheese, mascarpone, and heavy whipping cream build luscious fillings.
Lotus Biscoff biscuits and creamy cheeses combine for a crunchy, luscious dessert foundation bursting with caramel and cinnamon flavors.
Melted unsalted butter binds crusts and deepens flavor. Sweeteners such as powdered sugar and golden syrup balance sweetness and add moisture, while vanilla extract and a pinch of cinnamon enhance aroma and warmth.
The original Lotus Biscoff spread is made from caramelized biscuits combined with natural ingredients like rapeseed oil and emulsifiers, which contribute to its unique creamy texture.
Coffee or espresso brings richness to layered desserts, and a touch of salt sharpens overall taste. These thoughtfully selected ingredients guarantee your Biscoff dessert hits every delicious note.
Essential Kitchen Tools for Biscoff Recipes
Although crafting Biscoff desserts relies heavily on quality ingredients, having the right kitchen tools can make the process seamless and enjoyable.
Start with a food processor to crush Biscoff cookies finely for crumb bases, while an electric or stand mixer helps you whip cream cheese and fillings to silky perfection. This recipe is loved for its no baking necessary feature, making the right tools even more essential for preparation.
Choosing a food processor with high-quality stainless steel blades ensures consistent texture when crushing cookies.
Use various mixing bowls to keep ingredients separate and measuring cups and spoons for precise amounts.
A springform pan guarantees easy removal of delicate no-bake cheesecakes, and a refrigerator chills your creations to set flavors beautifully.
For melting Biscoff cookie butter, a microwave or double boiler prevents overheating. Don’t forget spatulas and knives for spreading and slicing, plus plastic wrap to keep freshness locked in.
Preparing the Biscoff Cookie Dough
As you prepare the Biscoff cookie dough, start by creaming unsalted butter with brown sugar until the mixture turns light and fluffy, revealing rich caramel notes essential to that signature flavor.
Next, blend in eggs and vanilla extract for a smooth, moist base. Gradually fold in sifted flour mixed with warm spices like cinnamon, nutmeg, and ginger to mimic Biscoff’s iconic profile.
Don’t forget to stir in Biscoff spread for extra softness and that unmistakable taste. The dough is typically gooey inside while having crispy edges, which creates a delightful texture contrast when baked.
Keep in mind these key points for perfect dough:
- Cream butter and sugars thoroughly for a tender crumb
- Add dry ingredients gradually to avoid lumps or overmixing
- Chill dough at least an hour to enhance flavor and ease shaping
Baking Perfect Biscoff Cookies
You’ll want to start with the right balance of brown sugar and butter to guarantee chewy, flavorful cookies. Baking at a steady 175-180°C (350°F) for 15-20 minutes helps achieve golden edges without overbaking.
Paying close attention to timing and texture will give you that perfect soft center with a satisfying crisp around the edges. Using a kitchen scale for accurate measurements ensures the correct ingredient ratios for the best cookie texture.
Key Ingredients Overview
The secret to baking perfect Biscoff cookies lies in selecting and balancing key ingredients that create their signature flavor and texture.
You’ll want to focus on core dry ingredients like wheat flour for structure, brown sugar syrup for moisture and caramel notes, plus cinnamon for that warm spice.
Essential fats such as sustainable palm oil or butter add richness and affect softness and spread. Leavening agents like baking soda guarantee a tender crumb, while eggs bind and add chewiness.
Keep these points in mind:
- Use fresh, high-quality cinnamon and flour to maximize flavor.
- Choose fats thoughtfully to control texture and mouthfeel.
- Measure ingredients precisely with a kitchen scale to prevent dryness or crumbliness.
- These cookies have been a favorite since 1932, reflecting their enduring popularity.
Baking Temperature and Time
When you preheat your oven to the ideal temperature—typically around 175°C (350°F)—you set the stage for Biscoff cookies that bake evenly with just the right balance of crisp edges and chewy centers.
Some recipes call for a slightly higher heat, around 200°C (400°F), to enhance browning, but be careful not to exceed this or your sugar-rich dough may burn.
If you have a fan-assisted oven, lowering the temperature to 165°C (325°F) helps achieve even baking. Bake your cookies between 12 and 14 minutes; underbaking slightly preserves softness inside, especially for thicker or stuffed cookies.
Before baking, it is important to fold dry ingredients gently into the wet mixture to maintain the ideal cookie texture.
After baking, let them cool briefly on the tray so they firm up before moving to a wire rack. This timing and temperature combo guarantees your Biscoff cookies come out perfectly every time.
Cookie Texture Tips
Mastering the perfect Biscoff cookie texture starts long before the dough hits the oven. You need to chill the dough so the flour fully hydrates, absorbing moisture from eggs and brown butter, which controls spreading and locks in chewiness.
Handling dough gently and measuring flour precisely prevents dryness and toughness. Using weight measurements for ingredients, especially flour, greatly improves accuracy and consistency in your cookies.
When shaping, aim for uniform thickness and chill cut-outs to reduce stickiness and guarantee even baking.
To nail that ideal texture, focus on these essentials:
- Chill dough to firm fats and enhance flavor while controlling spread
- Use brown sugar and Biscoff cookie butter for moist, chewy dough
- Bake until edges turn golden brown for a crisp exterior with a soft center
Making Biscoff Tiramisu With Mascarpone Cream
You’ll start by whipping up a luscious mascarpone cream, blending chilled heavy cream and Biscoff butter until smooth and fluffy. Mascarpone cheese should be at room temperature for smooth mixing, ensuring a creamy texture in your dessert.
Next, soak your Lotus Biscoff cookies briefly in strong coffee, then layer them carefully with the rich cream for a perfect balance of textures. These cookies are known for their spiced caramel flavor, which adds a unique twist compared to traditional ladyfingers.
Finally, let your tiramisu chill for several hours to allow the flavors to meld and the cream to set, creating a silky, indulgent dessert. For best results, chill the tiramisu in the fridge for at least 4 hours or overnight before serving.
Mascarpone Cream Preparation
Although it requires a delicate balance, preparing the Biscoff mascarpone cream is a rewarding step that elevates your tiramisu with a luscious, velvety texture.
Start by whipping chilled heavy cream to stiff peaks, then gently fold in softened mascarpone to keep the mixture airy. Incorporate Biscoff cookie butter next, whipping just until you achieve a smooth, glossy consistency.
Sweeten with granulated sugar and a touch of vanilla to enhance the caramelized spice notes. Using high quality mascarpone is essential to achieve the creamy thickness characteristic of classic tiramisu.
Keep these tips in mind for perfect cream:
- Use chilled utensils and ingredients to stabilize whipping
- Fold mascarpone gently to preserve volume
- Stop whipping once stiff peaks form to avoid graininess
Layering and Chilling Process
When assembling your Biscoff tiramisu, start by soaking the cookies briefly in espresso to guarantee they soften without becoming soggy.
Arrange a single or double layer evenly, then spread a generous mascarpone cream layer, covering edges completely. Repeat to build 2-3 layers, depending on your container’s height.
This no-bake dessert improves significantly with advance preparation, enhancing both texture and flavor. Smooth the final cream layer, removing excess before chilling.
Refrigerate for at least 4 hours—overnight is best—to let flavors meld and cream set firmly.
| Step | Action | Tip |
|---|---|---|
| Soaking | Dip cookies 1-2 seconds | Use shallow dish for speed |
| Layering | Alternate cookies & cream | Cover edges with cream |
| Final Smoothing | Smooth top layer | Scrape excess from edges |
| Chilling | Refrigerate 4+ hours | Cover to avoid drying |
Creating No-Bake Biscoff Pudding
Since this no-bake Biscoff pudding requires no oven time, you can quickly whip up a decadent dessert that balances creamy richness with spiced cookie crunch.
Start by whipping chilled heavy cream with sugar and vanilla until soft, billowy peaks form. Warm the Biscoff spread briefly for smooth layering. Using thickened cream is recommended for the best whipping consistency and texture.
Dip biscuits in cold milk just long enough to soften, avoiding sogginess, then layer biscuits, whipped cream, and Biscoff spread in a 9×13 pan. Chill for at least 2 hours to let flavors meld and the pudding firm up perfectly.
Remember to:
- Whip cream to soft peaks for airy texture
- Dip biscuits briefly to preserve slight crunch
- Chill thoroughly for best sliceable consistency
This no-bake pudding offers luscious layers showcasing creamy, spiced, and crunchy contrasts effortlessly.
Assembling a Biscoff Icebox Cake
Before you start layering your Biscoff icebox cake, prepare your 9″ x 5″ loaf pan by lining it thoroughly with plastic wrap, pressing the wrap into every corner to seal in moisture and guarantee easy removal later.
Line your 9″ x 5″ loaf pan with plastic wrap to ensure easy cake removal and retain moisture.
Begin with an even layer of the Biscoff cream mixture spread smoothly across the pan’s base. Place a single layer of Biscoff cookies atop, breaking them slightly to fit snugly along edges.
Alternate layers of cream and cookies three to four times, finishing with a cookie layer for texture. Ascertain each cream layer covers cookies fully to soften them during chilling.
Once assembled, cover the cake with plastic wrap to protect it from fridge odors. Refrigerate for at least 6–8 hours, letting flavors meld and cookies soften into that perfect cake-like texture. For best results, refrigerate the cake for 24-48 hours to achieve the ideal texture and flavor.
Techniques for Whipping and Folding Cream
You’ll want to start with well-chilled cream and tools to whip up perfect, fluffy peaks without splattering. It’s important to use a balloon whisk for the best whipping results, as it incorporates air efficiently.
When folding, use a gentle touch with a flexible spatula, cutting through the mixture and sweeping it over to keep all that airy volume intact.
Whipping Cream Tips
Although whipping cream might seem straightforward, mastering the right techniques can transform your dessert into a velvety masterpiece.
Start with cream that’s at least 30% fat and well chilled, along with a cold mixing bowl to guarantee maximum volume and stability. Chilling the cream and bowl to 5°C/41°F is essential for the best whipping results.
Use gentle, steady whisking at low speeds, gradually increasing as the cream thickens, to achieve smooth, medium-stiff peaks that hold their shape without becoming grainy. Remember to stop whipping as soon as you reach the desired consistency.
Keep these tips in mind:
- Chill cream and bowl to speed whipping and enhance air incorporation.
- Whisk slowly and steadily to build fine, stable texture.
- Add a pinch of salt or sugar gradually to boost flavor and stability.
Folding Without Deflating
When folding whipped cream into heavier mixtures, you’ll want to move slowly and deliberately to keep the airy texture intact. This gentle mixing is crucial to preserve the air in whipped cream.
Use a flexible spatula to cut through the center, lifting and folding the mixture over gently. Rotate the bowl a quarter turn with each fold to blend evenly without deflating the cream’s delicate air bubbles.
Start by folding in a small portion of whipped cream to lighten the heavier base before adding the rest. Stop as soon as no white streaks remain—overmixing breaks bubbles and leads to a dense texture.
Keep your bowl and tools cool, and use a large bowl to avoid spills. After folding, chill your Biscoff dessert to stabilize the airiness and guarantee a light, fluffy finish.
Decorating and Garnishing Biscoff Desserts
A beautifully decorated Biscoff dessert invites both the eye and palate to indulge in its rich flavors and textures.
Start by warming Biscoff cookie butter to create a smooth drip that cascades elegantly over the cake edges. Use piping tips like 1M or 2D to craft delicate swirls and borders, enhancing the cake’s finesse.
Incorporate crushed Biscoff cookies into your frosting for a delightful crunch and sprinkle crumbs sparingly to avoid sogginess.
The unique filling and drip decoration featured in Biscoff cakes add an extra layer of visual and taste appeal.
Key decorating tips to elevate your Biscoff dessert:
- Chill between frosting layers for clean, sharp edges and set drips firmly
- Strategically place whole or halved cookies atop frosting swirls for visual interest
- Finish with Biscoff truffles or a cinnamon dusting to enrich aroma and appeal
Tips for Storing and Serving Biscoff Treats
To keep your Biscoff treats tasting fresh and delicious, you’ll want to store them thoughtfully and serve them at their best.
Store cookies in airtight containers at room temperature for up to 10 days, but enjoy them within 3-4 days for peak crispness. Freeze dough or cookies in freezer-safe bags for 2-3 months, labeling with dates. Thaw dough briefly before baking, or bake frozen dough by adding a couple of minutes.
Creamy Biscoff desserts must be refrigerated and consumed within 2-3 days, letting them sit at room temperature briefly before serving for better flavor.
Serve cookies at room temperature or slightly warmed, and chilled layered desserts to balance textures. Use individual servings and garnish with fresh crumbs or warm spread for a delightful finish.
Frequently Asked Questions
Can I Substitute Mascarpone With Cream Cheese in Biscoff Tiramisu?
Yes, you can substitute mascarpone with cream cheese in your tiramisu. Just soften the cream cheese to room temperature, whip it with powdered sugar, then fold in heavy cream to mimic mascarpone’s creamy texture.
This swap adds a slight tang but keeps the dessert rich and fluffy. Adjust sweetness to taste, and avoid over-whipping to maintain lightness. You’ll still get that luscious, indulgent feel in every bite.
How Long Do Homemade Biscoff Cookies Stay Fresh?
Homemade Biscoff cookies stay fresh like a warm hug for about 10 days at room temperature when stored in an airtight container.
Make sure you cool them completely before sealing to keep their perfect crunchy texture. If you want to enjoy them longer, pop them in the fridge for up to three weeks or freeze for three months.
Just let them come back to room temp before savoring that rich, caramelized flavor.
Is It Possible to Make Biscoff Desserts Vegan-Friendly?
You can definitely make delicious vegan-friendly Biscoff desserts by swapping out dairy ingredients for plant-based alternatives.
Use vegan cream cheese, tofu, or dairy-free yogurt to achieve creamy textures. Vegan butter and dairy-free whipping cream help maintain richness, while Biscoff spread itself is usually vegan, offering that signature flavor.
With simple, no-bake recipes and easy-to-find ingredients, you’ll enjoy indulgent, plant-based treats without compromising on taste or texture.
What Is the Best Way to Soften Hard Biscoff Cookie Butter?
To soften hard Biscoff cookie butter, you’ll want to warm it gently. Spoon your desired amount into a microwave-safe bowl and heat on low power for 20-30 second intervals, stirring after each to evenly distribute heat.
If you prefer, place the butter in a stainless steel bowl over simmering water, stirring constantly to avoid burning. Let it soften until glossy and spreadable, but be careful not to overheat or melt it completely.
Can I Freeze Biscoff Icebox Cake for Longer Storage?
Freezing your icebox cake is like pressing pause on a delicious movie—you can save it for later, but the texture might shift.
You can freeze it tightly wrapped for up to a month, but expect the whipped cream to firm up and lose some smoothness.
Thaw slices at room temperature for about 15 minutes to soften before serving. Just avoid repeated freeze-thaw cycles, as they’ll turn your creamy delight into a less enjoyable experience.
Sweet Success: Let Your Biscoff Creations Shine
Now that you’ve mastered these heavenly Biscoff dessert recipes, your kitchen will smell like the gates of dessert paradise every time you bake.
With just a few simple ingredients and your newfound skills, you’ll create treats so irresistible, people will beg you for more.
Remember, the secret lies in the perfect balance of creamy mascarpone, crunchy Biscoff, and light, fluffy cream. So, jump in and let your sweet creations steal the show.

