How to Cook Chicken in Cast Iron: First Step to Success
To cook chicken in cast iron, start by choosing skin-on cuts for juiciness and crisp skin. Preheat your skillet evenly over medium-high heat, then coat it lightly with high-smoke-point oil.
Pat the chicken dry, season it well, and place it skin-side down without crowding. Sear undisturbed for several minutes, then finish cooking in a hot oven until the internal temperature hits 165°F.
Rest before serving. Mastering these steps guarantees flavorful, perfectly cooked chicken; explore how butter and herbs can elevate it further.
Key Takeaways
- Preheat the cast iron skillet evenly over medium-high heat for 5-10 minutes before adding oil and chicken.
- Pat chicken dry, season generously, and use skin-on cuts for crisp, juicy results.
- Use high smoke point oils like avocado or grapeseed; apply a thin, even layer in the skillet.
- Sear chicken skin-side down without moving for 5-7 minutes to develop a golden crust before finishing in a 400-450°F oven.
- Cook until internal temperature reaches 165°F, then rest chicken 5-10 minutes to retain moisture and enhance flavor.
Essential Ingredients and Process for Cast Iron Chicken
| Ingredients | Process |
|---|---|
| Skin-on chicken cuts (breasts, thighs, or whole pieces) | Choose skin-on cuts for maximum juiciness and crispy skin development |
| Kosher salt and black pepper | Pat chicken completely dry with paper towels, then season generously on all surfaces |
| High smoke point oil (avocado, canola, or grapeseed) | Apply thin, even layer to preheated skillet using lint-free cotton rag |
| Optional seasonings (garlic powder, paprika, herbs) | Apply dry rub generously after patting dry, let rest briefly for deeper flavor |
| Fresh herbs (rosemary, thyme) | Add during cooking or mix into softened butter for under-skin application |
| Butter | Use for basting and flavor enhancement during final cooking stages |
| Lemon wedges or citrus zest | Add to pan or inside cavity for brightness and balanced flavor |
Choosing the Right Chicken Cuts for Cast Iron Cooking
When choosing chicken cuts for cast iron cooking, you’ll want to prioritize those that maximize flavor and moisture retention. Skin-on chicken breasts are ideal they develop a crispy, flavorful crust via the Maillard reaction and retain juiciness better than skinless cuts.
Skin-on chicken breasts create a crispy, flavorful crust and stay juicier than skinless options.
Thighs, both bone-in and boneless, offer higher fat content, ensuring moist, flavorful results in your skillet. Whole chicken halves or quarters also benefit from cast iron’s even heat distribution, cooking thoroughly without drying out.
Smaller cuts like tenders and wings sear quickly but require close monitoring to avoid overcooking. Always season your chicken well and pat it dry before cooking to enhance flavor and skin crispiness.
Preparing Your Cast Iron Skillet for Perfect Searing
Before searing, preheat your cast iron skillet evenly over high heat to guarantee a consistent temperature across the surface. Wipe the skillet dry with a towel to remove any moisture, then apply a thin layer of oil to promote ideal browning.
Proper maintenance includes applying a very light layer of Crisco Shortening after cleaning to preserve the seasoning layer. Start cooking immediately to lock in the heat and achieve a perfect crispy crust on your chicken.
Skillet Preheating Essentials
Three to five minutes of low heat preheating is crucial to prepare your cast iron skillet for perfect searing. Cast iron heats slowly but retains heat exceptionally well, so preheat on low to avoid hot spots and warping.
This gentle, consistent heat allows the entire pan surface to warm evenly, minimizing temperature fluctuations when you add chicken. Preheating also helps the oil to polymerize, creating a durable layer that enhances the pan’s seasoning and nonstick surface seasoning build-up.
Avoid preheating on high or adding oil prematurely, as this can cause smoking or damage the seasoning. Electric and induction stovetops require particular care monitor your pan to prevent overheating.
Proper preheating guarantees rapid Maillard reactions, prevents sticking, and delivers consistent browning. Over time, experience will help you calibrate timing for your specific pan and stove, but starting with a low, steady 3–5 minute preheat is the foundation for flawless cast iron cooking.
Optimal Oil Application
Selecting and applying the right oil is vital to preparing your cast iron skillet for perfect searing. Choose oils with high smoke points like avocado, canola, or grapeseed oil to withstand the heat without burning.
Avocado oil and grapeseed oil are particularly recommended because of their high smoke points, which make them effective for bonding a durable seasoning layer.
Use a lint-free cotton rag to apply a liberal, even coat, covering every nook, side, and handle. Then wipe off excess oil with a paper towel to prevent sticky residues. Avoid pouring oil directly into a hot pan; this risks uneven seasoning and smoking.
Heat the skillet to 300°F–400°F to polymerize the oil, transforming it into a durable, slick non-stick layer essential for searing chicken. Proper oil application and controlled heating guarantee a smooth, long-lasting seasoning that enhances your cast iron’s performance.
Seasoning and Preparing Chicken for Optimal Flavor
Start by patting your chicken completely dry to guarantee a crisp, golden skin when searing. Then, season generously with salt and your preferred spices, making sure to cover all surfaces for deep, even flavor.
Finally, consider uniform thickness or resting time to promote consistent cooking throughout. Using high-quality meats like those from Butcher Box can significantly enhance the flavor and texture of your chicken.
Drying Chicken Thoroughly
A crucial step in preparing chicken for cast iron cooking is drying it thoroughly to guarantee ideal flavor and texture. Excess moisture prevents crisp skin, causes splattering, and hinders proper browning.
Pat your chicken dry with paper towels, pressing gently to absorb surface water. For larger cuts, air-dry uncovered in the fridge overnight. Avoid rinsing, as it adds moisture and contamination risk. Properly dried chicken sears evenly, crisps well, and retains juicy interior moisture.
Additionally, patting chicken dry before searing helps achieve better browning and prevents sticking to the pan.
| Benefit | Method |
|---|---|
| Crisp skin | Pat dry with paper towels |
| Even cooking | Air-dry in fridge uncovered |
| Safety | Avoid rinsing, reduce splattering |
| Better browning | Remove surface moisture |
| Flavor absorption | Dry surface enhances seasoning adhesion |
Seasoning Techniques
Mastering seasoning techniques elevates your cast iron chicken from simple to sensational. Start by patting the chicken dry to guarantee the spices stick well. Using a high-quality knife can aid in precise cuts that enhance seasoning absorption.
Select a seasoning blend that suits your taste—classic garlic and paprika, Mediterranean herbs, or bold Tex-Mex. Apply the dry rub generously on all sides, then drizzle oil with a high smoke point, like avocado or canola, to enhance browning and flavor absorption.
Choosing smaller chicken breasts can help the chicken cook more evenly and become less chewy. Let the chicken rest briefly to deepen the seasoning’s impact. Adding fresh herbs or citrus zest during cooking can further elevate aroma and brightness without overpowering natural flavors.
- Use balanced blends like garlic powder, rosemary, salt, and pepper for versatility.
- Opt for oils that endure high heat to avoid burning.
- Incorporate herbs and citrus for fresh complexity.
Uniform Thickness Benefits
Because uneven thickness leads to inconsistent cooking, flattening your chicken to a uniform thickness guarantees every piece cooks evenly and stays juicy.
Pounding breaks down muscle fibers, tenderizing the meat and allowing seasonings to penetrate uniformly. This mechanical tenderization eliminates the need for chemical tenderizers, improving texture and flavor.
Uniform pieces cook faster, reducing moisture loss and preventing dryness during longer cooking times. A consistent thickness also enhances searing, promoting even browning and maximizing flavor through the Maillard reaction.
Pounding chicken also reduces cooking time as thinner meat heats faster. Additionally, it simplifies timing and portion control, minimizing waste by ensuring all parts reach ideal doneness simultaneously.
Step-by-Step Cooking Process for Juicy Cast Iron Chicken
When cooking chicken in cast iron, proper preparation and heat control are essential for juicy, flavorful results. Start by patting the chicken dry and seasoning it generously with kosher salt and pepper.
Preheat your well-seasoned cast iron skillet over medium heat and lightly coat it with a high smoke point oil like safflower. For thighs, place them skin-side down and sear on medium-high heat for 5 minutes, then reduce to medium before flipping. Using a splatter guard can help prevent hot oil injuries during this process.
For breasts, sear on low to medium heat until browned, then finish in the oven for even cooking. Minimize movement to develop a crispy crust and use the cast iron’s retained heat to cook through perfectly.
- Dry, seasoned chicken is ready for searing
- Searing skin-side down for crispiness
- Adjusting heat to prevent burning and guarantee doneness
Monitoring Temperature and Ensuring Safe Doneness
Although cooking chicken in cast iron can yield delicious results, monitoring its internal temperature is essential to guarantee safety and proper doneness.
Always aim for a minimum internal temperature of 165°F, measured at the thickest part of the breast or thigh using a reliable meat thermometer. This assures that harmful bacteria like Salmonella are eliminated.
Using a meat thermometer is the most reliable method to ensure the chicken reaches this safe temperature. Avoid relying solely on visual cues or texture; these aren’t foolproof. If you lack a thermometer, check that juices run clear when cutting into the meat.
Cooking times vary; smaller breasts may take 10-12 minutes, while larger or bone-in pieces require longer.
Enhancing Flavor With Butter, Herbs, and Citrus
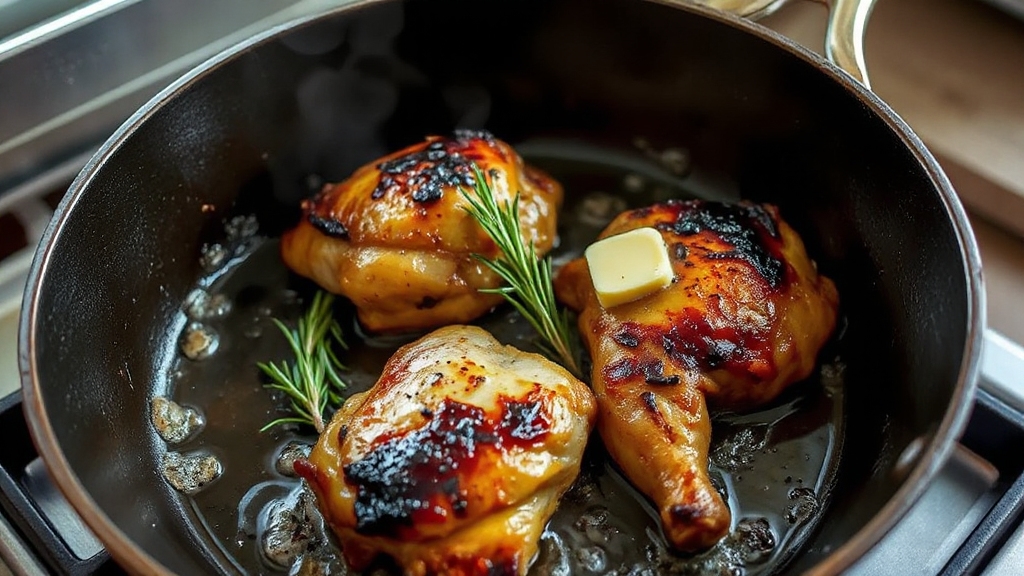
To elevate the flavor of your cast iron chicken, incorporate butter, fresh herbs, and citrus throughout the cooking process. Spread softened, herb-infused butter under the chicken skin to lock in moisture and infuse deep flavor.
Adding lemon wedges to the pan or inside the cavity brightens richness while herbs like rosemary and thyme impart aromatic complexity. For best results, pat the chicken dry before applying the butter to ensure better adherence and even cooking.
Finish by basting with pan juices enriched with butter, herbs, and citrus for a glossy, flavorful crust.
- Apply compound butter (butter, garlic, herbs, lemon zest) beneath the skin before cooking
- Place fresh herb sprigs and lemon wedges inside the cavity or pan
- Baste periodically with pan sauce, combining melted butter, herbs, and lemon juice
This method balances butter’s richness with herbal earthiness and citrus brightness, creating a sophisticated, moist, and flavorful chicken.
Tips and Troubleshooting for Cast Iron Chicken Success
Mastering cast iron chicken requires careful attention to heat management and preparation techniques. Preheat your skillet for 5-10 minutes over medium-high heat and use oils with high smoke points to avoid burning. Vegetable oil is recommended to prevent sticking in the skillet, even if it is well-seasoned.
Pat chicken dry and season evenly to guarantee a crisp crust. Place chicken skin-side down and avoid moving it during the first 5-7 minutes to prevent sticking and tearing. Flip once to maintain moisture.
Finish cooking in a 400-450°F oven, using an instant-read thermometer to reach 165°F for safe, juicy results. Don’t overcrowd the pan; cook in batches if needed. If the chicken sticks, it means your pan or oil isn’t hot enough. Allow chicken to rest 5-10 minutes post-cooking to redistribute juices and maximize tenderness.
Frequently Asked Questions
Can I Use Cast Iron to Cook Frozen Chicken Directly?
Yes, you can cook frozen chicken directly in cast iron. Just make certain your skillet is large enough to avoid overcrowding, and preheat it with oil to prevent sticking. Cook the chicken on one side until browned, then flip and season.
Use a thermometer to guarantee the internal temperature reaches 165°F for safety. Let the chicken rest after cooking to retain juices. Proper heat and timing are key for even, safe cooking.
How Do I Clean and Maintain Cast Iron After Cooking Chicken?
After cooking, pour off excess grease and wipe your cast iron with a paper towel. Use warm water and a plastic scraper to remove stuck bits—avoid harsh soaps or soaking.
For stubborn residue, scrub with a kosher salt paste and reheat slightly if needed. Dry thoroughly over low heat, then apply a thin layer of vegetable oil to maintain seasoning. Store with the lid off to prevent moisture buildup and rust.
Is Cast Iron Safe for Cooking Acidic Marinades With Chicken?
You can safely cook acidic marinades with chicken in cast iron if your pan is well-seasoned and maintained. Limit cooking time to under 30–45 minutes to prevent acid from breaking down the seasoning and causing metallic flavors.
For longer acidic cooks, use enameled cast iron or nonreactive pans instead. Always clean, dry, and re-oil your cast iron promptly after acid exposure to preserve seasoning and avoid flavor issues.
Can I Cook Chicken and Vegetables Together in the Same Skillet?
Think of your skillet as a stage where chicken and vegetables perform a harmonious duet. Yes, you can cook them together in the same pan. Preheat the cast iron for even heat, sear the chicken first for crispy skin, then add evenly cut vegetables to roast.
This method locks in flavors, simplifies cleanup, and guarantees balanced cooking. Just monitor cooking times and internal temperature for perfect results every time.
What’s the Best Way to Reheat Cast Iron Cooked Chicken?
To reheat cast-iron cooked chicken, preheat your oven to 350°F. Arrange chicken in a single layer on a baking dish, add a bit of broth or water to keep it moist, and cover loosely with foil. Heat until it reaches 165°F internally.
For crispy skin, remove foil in the last 5 minutes and broil briefly. Alternatively, use medium heat on the stove with a lid and a splash of liquid for even, moist reheating.
From Stovetop to Oven: Finishing Chicken to Perfection
Now that you know how to master cooking chicken in cast iron, why settle for anything less than juicy, flavorful results? With the right cuts, proper seasoning, and careful temperature control, you can achieve perfectly seared chicken every time.
Don’t forget to enhance your dish with butter, herbs, and citrus for that extra layer of taste. Ready to impress your guests with cast iron perfection? Your skillet is waiting—let’s get cooking.

