Banana Protein Bar Recipe: The Ultimate Healthy Snack
You can make banana protein bars packed with 12–20 grams of complete protein by blending ripe bananas, protein-rich seeds or powders, and gluten-free flours like almond or hazelnut.
Combine wet ingredients first, then fold in dry components. Press the batter evenly and bake at 325–350°F for 20–35 minutes.
Cooling thoroughly before cutting guarantees perfect texture. Adjust ingredients to suit dietary needs or enhance flavor with nuts and spices. Keep going to discover detailed preparation and storage tips.
Key Takeaways
- Use ripe bananas with brown spots for natural sweetness and moisture to create a flavorful, soft protein bar base.
- Combine diverse protein sources like protein powders, chia, hemp, and nut butters to reach 12-20 grams of protein per serving.
- Press the batter evenly in a baking dish and bake at 325–350°F for 20–35 minutes, checking doneness with a toothpick.
- Cool bars completely on a wire rack for about 15 minutes before slicing to ensure proper texture and shape.
- Store bars refrigerated in airtight containers for up to one week or freeze up to six months to maintain freshness.
Quick Recipe Reference of Banana Protein Bars
| Ingredients & Tools | Steps & Actions |
|---|---|
| 3 ripe bananas (with brown spots) | Mash bananas until smooth for natural sweetness and moisture. |
| 1 cup protein powder (whey or plant-based) | Combine with wet ingredients like mashed bananas, nut butter, and milk or alternative. Mix well. |
| ½ cup nut butter (almond, peanut, or cashew) | Stir in nut butter to boost protein and improve texture. |
| 1 cup oats or almond flour | Fold dry ingredients gradually into wet mixture to maintain airiness. |
| 2 tbsp chia or flaxseeds | Add seeds for extra fiber and binding. Let the mixture rest for a few minutes. |
| 1 tsp cinnamon or vanilla extract | Enhance flavor naturally with spices or extracts of your choice. |
| Pinch of salt & baking powder (optional) | Add leavening for a light, chewy texture. |
| Baking pan & parchment paper | Line your pan, preheat oven to 325–350°F, and spread batter evenly. |
| Oven thermometer (optional) | Bake for 20–35 minutes, checking doneness with a toothpick. |
| Cooling rack & knife | Cool completely for 10–20 minutes before slicing into bars. |
| Airtight container or freezer bag | Store properly: Refrigerate for 1 week or freeze for up to 6 months. |
Nutritional Benefits of Banana Protein Bars
While many snack options fall short nutritionally, banana protein bars offer a well-rounded profile that supports muscle repair, energy balance, digestion, and overall health.
Banana protein bars provide balanced nutrition that enhances muscle repair, energy, digestion, and overall wellness.
You’ll find these bars typically contain 12 to 20 grams of protein per serving, using complete amino acid sources like plant-based proteins or whey. This aids muscle recovery and sustains lean mass. Regular maintenance of nutritional intake is key to optimizing physical performance.
The natural carbohydrates in bananas provide steady energy release, thanks to moderate glycemic indexes and fiber content that slow digestion and prevent crashes. The low glycemic index of bananas helps moderate blood sugar levels after consumption.
Dietary fibers such as pectin and resistant starch act as prebiotics, promoting gut microbiota health and improving bowel regularity.
Additionally, essential micronutrients like potassium, vitamin B6, and magnesium support metabolic processes, muscle function, and antioxidant defenses. This makes banana protein bars a scientifically sound choice for your nutritional needs.
Essential Ingredients for Perfect Bars
Understanding the nutritional benefits of banana protein bars sets the stage for selecting the right ingredients to maximize both health value and taste.
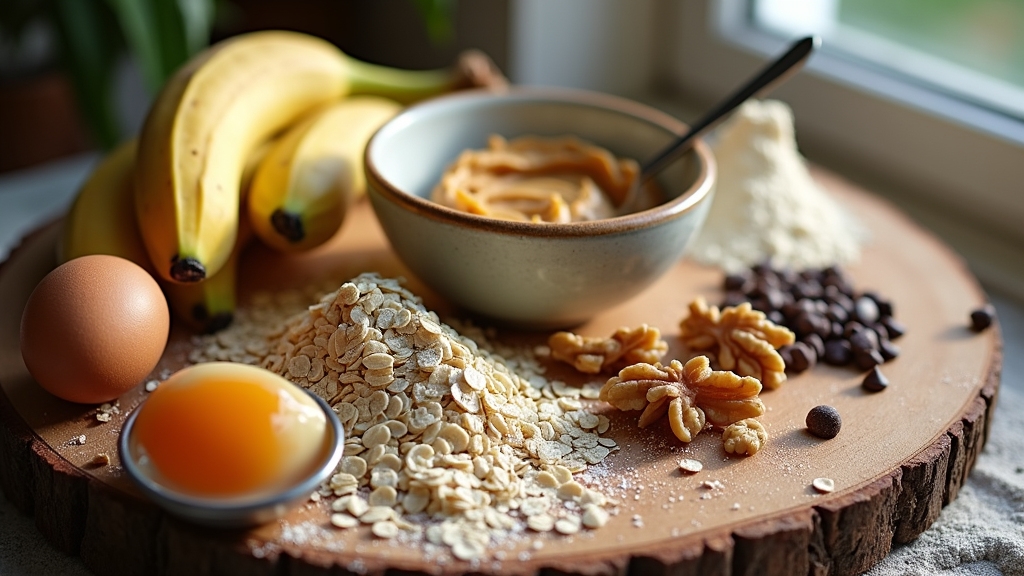
You’ll want ripe bananas with brown spots for natural sweetness and moisture, avoiding overly mushy ones to maintain texture. Incorporate diverse protein sources like chia, hemp, or pumpkin seeds, alongside protein powders or nut butters, ensuring 10 to 20 grams of protein per bar. Using a ventilated area for preparation and storage can help preserve freshness and safety.
Use gluten-free flours, such as almond, hazelnut, or buckwheat, for a nutrient-dense base. Natural binders like flaxseeds can help hold the bars together.
Limit added sweeteners, relying mainly on banana’s sugars, with optional coconut nectar or vanilla for subtle enhancement. These bars are also freezer-friendly, making meal prep and storage convenient.
Finally, consider nuts and superfood toppings for antioxidants, fiber, and healthy fats. Prioritize whole, organic ingredients to ensure excellent nutrition and flavor balance.
Step-by-Step Preparation Guide
First things first, let’s mash those ripe bananas really well. You want them to be nice and smooth so that your batter comes together perfectly. Using a blender can help ensure the bananas are completely mashed for a smoother texture. Once you’ve got that down, mix in your favorite wet ingredients to help everything bind together nicely.
Next up, it’s time to preheat your oven to the right temperature. While that’s warming up, go ahead and press the batter evenly into your prepared baking dish. This little step helps ensure that everything cooks evenly, which is super important for the final result.
After you’ve baked your delicious creation, make sure to let it cool completely on a wire rack. This is key for getting the right texture before you slice it up. Trust me, it’s worth the wait!
Ingredient Preparation Tips
Because ripe bananas with brown spots offer ideal sweetness and moisture, you should select them carefully for your banana protein bars. Mash the bananas thoroughly but gently to maintain some texture critical for structure.
Prepare wet ingredients, including eggs, milk or alternatives, nut butters, and flavorings, separately. Using the right equipment can help optimize kitchen workflow during preparation.
Ensure thorough mixing before combining with dry components. Accurately measure and sift dry ingredients like oats, protein powder, and leavening agents for uniformity.
Mash bananas in a separate bowl for even distribution. Mix wet ingredients completely to avoid clumping. Gradually fold in dry ingredients to preserve batter airiness. Including Greek yogurt in the wet ingredients enriches the batter with moisture and protein.
Baking and Cooling Instructions
Once you’ve prepared your banana protein bar batter and preheated the oven to the recommended temperature between 325°F and 350°F, place the pan on the middle rack to guarantee even heat distribution. Using an oven thermometer can help maintain the correct baking temperature for consistent results.
Bake for 20 to 35 minutes, depending on bar thickness, checking doneness with a toothpick. Remove bars when edges brown lightly and centers are set but slightly soft. This baking time helps maintain a fresh texture compared to commercial bars.
Cool bars in the pan on a flat surface for 10–20 minutes before slicing.
| Step | Temperature (°F) | Duration (minutes) |
|---|---|---|
| Preheat Oven | 325–350 | 10–15 |
| Baking | 325–350 | 20–35 |
| Cooling | Room Temp | 10–20 |
This method guarantees even cooking, prevents dryness, and promotes excellent bar texture.
Baking and Cooking Tips for Ideal Texture
When you’re baking those bars, it’s best to stick to a moderate temperature, anywhere between 325°F and 350°F. This range really helps with even cooking and keeps that moisture locked in. Trust me, you don’t want to overbake them! Using a consistent temperature ensures the bars bake evenly without drying out.
A quick toothpick test can be your best friend here—just poke it in the center and if it comes out clean, you’re good to go. Once they’re out of the oven, let them cool down completely. You can either leave them at room temperature or pop them in a turned-off oven.
This little step is key for getting those clean, firm slices when you’re ready to cut. To maintain the bars’ freshness and texture, it’s best to store in fridge for up to a week and freeze any extras.
Optimal Oven Temperature
Although oven temperatures between 325°F and 350°F are commonly recommended for baking banana protein bars, selecting the precise temperature directly influences the bar’s moisture, texture, and baking time.
Baking at 325°F fosters a moist, dense texture with longer baking times (40-45 minutes), while 350°F offers a firmer bar with slight edge crispness in a shorter time (20-25 minutes). This range ensures the baking process does not dry out the bars, much like how dehydrators remove moisture gently to preserve food.
Temperatures above 350°F risk drying out or overbrowning, compromising texture. Consistent temperature and middle rack placement ensure even cooking.
Use 325°F for chewiness and moisture retention. Opt for 350°F if pressed for time and prefer firmer bars.
Avoid opening the oven door to maintain temperature stability. Choose carefully to balance texture and baking efficiency.
For best results, pour batter into a lightly greased bread pan before baking to promote even cooking and ease of removal, as this method helps achieve a smooth, thick dough.
Cooling and Cutting
After baking your banana protein bars at the ideal oven temperature, proper cooling techniques play a significant role in achieving the desired texture.
Transfer bars to a wire rack after cooling in the pan for a few minutes to promote even air circulation, preventing sogginess and preserving firmness. This step is similar to the importance of regular maintenance in kitchen tools to ensure optimal results.
Allow bars to cool completely at room temperature, typically 15 minutes or until fully set, before slicing. The total preparation, including baking and cooling, usually takes about 45 minutes.
Optional refrigeration for 10-15 minutes can enhance firmness and produce cleaner cuts.
Use a sharp knife, wiping the blade between cuts to maintain precision and avoid crumbling, especially with chocolate toppings.
Cutting warm bars disrupts structure, causing breakage.
Proper cooling and cutting preserve chewiness and shape, while correct storage, room temperature for short-term or refrigeration and freezing for extended freshness, maintains texture and quality effectively.
Customizing Your Bars for Dietary Needs

When tailoring banana protein bars to meet specific dietary needs, adjusting protein sources and ingredient composition plays a crucial role.
You can modify protein content by increasing banana puree or flour, or incorporating protein powders like plant-based or collagen to boost density without changing the banana’s flavor. Selecting the right grind size of protein powders can affect texture and mixability in your bars.
For gluten-free or vegan diets, swap wheat derivatives for certified gluten-free oats and nut or seed flours.
Replace animal proteins with plant-based alternatives. Consider sugar content carefully by relying on ripe bananas and natural sweeteners to reduce added sugars, especially for diabetic or low-carb needs.
Using banana flour, which contains high dietary fiber and resistant starch, can enhance the nutritional profile and gut health benefits of your bars.
Use seed flours and plant proteins for allergen-friendly bars.
Increase protein to >20 g per serving for athletic nutrition.
Substitute vegan binders like chia seeds to maintain texture.
These precise adjustments optimize your bars for diverse nutritional goals.
Flavor Enhancements and Ingredient Variations
Adjusting protein sources and dietary components sets the foundation for your banana protein bars, but enhancing flavor and texture elevates them to a more enjoyable experience.
Choosing the right proteins and ingredients builds the base, while flavor and texture bring your banana bars to life.
You can boost sweetness naturally by using riper bananas or adding natural sweeteners like maple syrup and coconut sugar. Incorporate fresh or dried fruits for bursts of flavor and texture contrasts.
Spice additions such as cinnamon and nutmeg not only deepen flavor complexity but also contribute antioxidant benefits. Toasted nuts and seeds introduce crunch and healthy fats, while nut butters enhance richness and binding.
Selecting flours like oat or almond flour adjusts chewiness and moisture, complementing banana’s texture. Combining extracts and layering flavors ensures uniformity and complexity, creating bars that are both nutritionally balanced and sensorially satisfying.
Storage Methods and Serving Suggestions
Although banana protein bars offer convenient nutrition, proper storage is essential to maintaining their freshness, texture, and safety.
Store sliced bars at room temperature in containers with light lids for up to 1-2 days to balance airflow and moisture, preventing spoilage. Letting the dough sit for 15 minutes before baking ensures optimal moisture absorption and texture in the final bars. Using airtight containers helps control moisture and contamination during storage.
Refrigerate bars in airtight containers to extend shelf life up to one week, reducing staleness and mold growth.
For long-term storage, freeze bars in airtight packaging, ideally wrapped individually to avoid freezer burn, preserving nutrition and flavor for months.
Before serving, reheat refrigerated or thawed bars briefly in a microwave or oven to restore softness.
- Refrigerate for up to 1 week; freeze for 1-6 months
- Use airtight containers to control moisture and contamination
- Reheat bars post-storage to enhance texture and flavor
Frequently Asked Questions
Can I Freeze Banana Protein Bars for Longer Storage?
Yes, you can freeze banana protein bars for longer storage, typically up to 2 to 3 months without significant quality loss.
Beyond that, flavor and texture may degrade, although the bars remain safe if kept continuously frozen.
To maintain ideal quality, wrap them tightly in airtight packaging and label with the freezing date.
Avoid refreezing thawed bars and thaw them in the refrigerator overnight to preserve texture and nutritional content.
What Is the Best Way to Reheat Leftover Bars?
The best way to reheat leftover bars is by microwaving them for 20-30 seconds on medium power after removing any wrappers.
This method warms the bars evenly, enhances flavor, and creates a moist, cake-like texture.
Let them rest for a minute post-heating to distribute heat internally.
Alternatively, you can use an oven at 300°F (150°C) for 5-10 minutes, wrapped in foil, to maintain moisture without drying out.
How Do Banana Protein Bars Compare to Commercial Energy Bars?
Banana protein bars are like a fresh breeze compared to commercial energy bars. They offer natural sugars and moderate protein but less carbohydrate density.
You’ll get fewer added vitamins and less protein variety, making them better for moderate snacking rather than intense recovery.
Commercial bars optimize carbohydrate-to-protein ratios for sustained energy and muscle repair. They often contain preservatives and artificial ingredients.
In contrast, banana bars emphasize whole foods with shorter shelf life and cleaner ingredient profiles.
Are Banana Protein Bars Suitable for Children’s Snacks?
Yes, banana protein bars can be suitable for children’s snacks if you consider their age and nutritional needs.
They provide moderate calories and some protein, but may lack sufficient protein for older kids.
Watch for allergens like nuts or dairy, and choose bars with low added sugars.
Homemade versions let you regulate ingredients, making them safer for allergies.
Always confirm bars are appropriate in size to prevent choking hazards for young children.
Can These Bars Replace a Full Meal for Weight Loss?
Think of replacing a full meal with these bars as swapping a detailed painting for a quick sketch. They can capture the basics but miss nuanced details.
Yes, you can use banana protein bars for weight loss since they control calories and provide protein and fiber to curb hunger.
However, you’ll need to watch total daily intake and supplement with whole foods to avoid nutrient gaps and maintain metabolic health effectively.
Bring This Healthy Banana Snack into Your Routine
Now that you’ve mastered the banana protein bar recipe, you’re equipped to fuel your body with a powerhouse snack that’s as nutritious as it is delicious.
With precise ingredient choices and careful preparation, these bars deliver ideal texture and flavor every time.
Don’t be surprised if they become your go-to snack faster than a rocket launch. Customizable to any dietary need and easy to store, they’re truly a scientific marvel in convenient nutrition.