Beef Denver Steak Recipe: Perfectly Tender Every Time
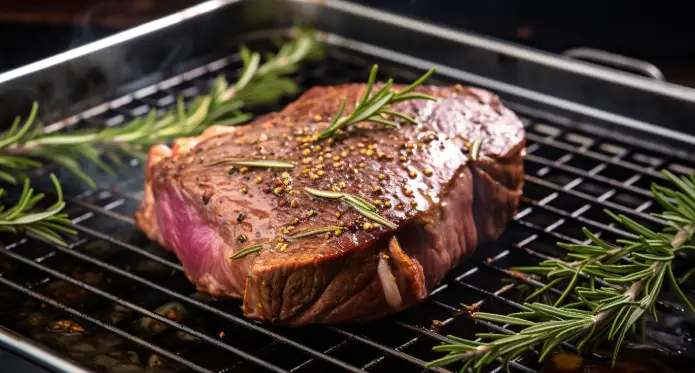
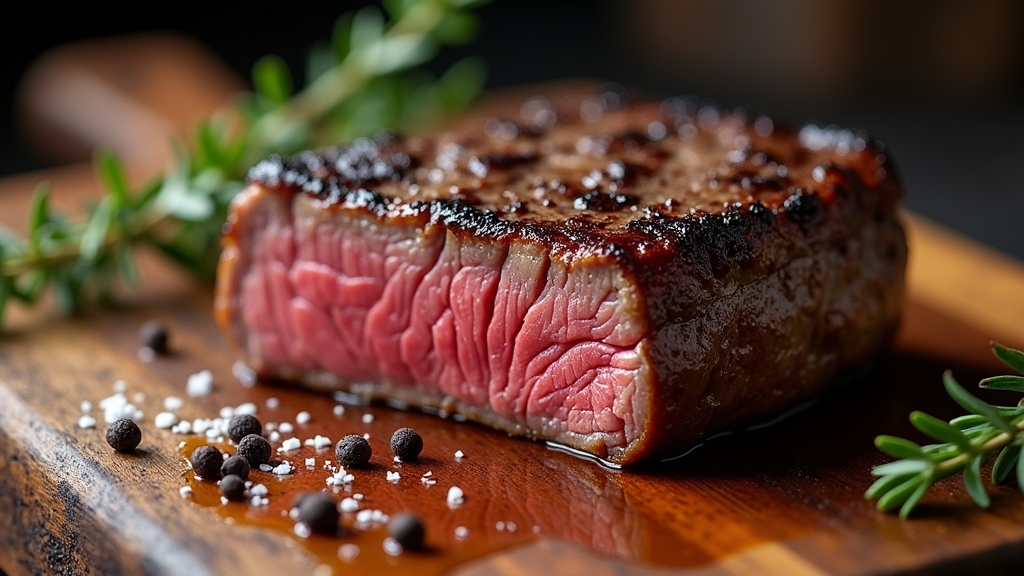
Choose Denver steak from the chuck primal with fine marbling and about 1–1.5 inches thickness. Pat it dry, season generously with kosher salt at least 45 minutes before cooking, then add pepper just before searing.
Use a hot cast-iron skillet or grill preheated to 450–500°F to sear each side 3–4 minutes, then finish over indirect heat to medium-rare. Rest the steak 5–10 minutes before slicing against the grain for maximum tenderness.
Discover techniques for seasoning, equipment, and serving to elevate your steak experience.
Key Takeaways
- Select boneless Denver steak from the serratus ventralis muscle, 1–1.5 inches thick, with fine marbling and bright red color for optimal tenderness.
- Trim excess fat and silver skin, pat dry, and season generously with kosher salt at least 45 minutes before cooking for deep flavor penetration.
- Preheat a cast-iron skillet or grill to high heat, sear steak 2–4 minutes per side, and finish in a 400°F oven if thick for even cooking.
- Rest steak tented with foil for 5–10 minutes after cooking to redistribute juices and enhance tenderness and flavor.
- Slice against the grain using a sharp knife and serve with complementary sauces like garlic herb butter or peppercorn cream.
Quick Recipe Reference: Denver Steak Made Simple
| Ingredients / Tools | Steps & Actions |
|---|---|
| Denver steak (1–1.5 inches thick) | Pat the steak dry with paper towels to ensure a good sear. |
| Salt and black pepper | Season generously on both sides to enhance the steak’s natural beefy flavor. |
| Cast-iron skillet or heavy pan | Preheat the pan over medium-high heat until very hot. |
| High-smoke-point oil (avocado or canola) | Add oil and swirl to coat the pan evenly. |
| Tongs | Place steak in the pan and sear undisturbed for 3–4 minutes per side. |
| Butter | Add butter during the final minute for rich flavor and browning. |
| Garlic cloves & fresh herbs (optional) | Baste the steak with melted butter, garlic, and herbs. |
| Meat thermometer | Cook to desired doneness: Medium-rare at 130–135°F. |
| Cutting board | Remove steak and let it rest for 5 minutes to retain juices. |
| Sharp knife | Slice against the grain for maximum tenderness. |
Understanding the Denver Steak Cut
Although it may be less familiar than ribeye or tenderloin, the Denver steak offers a unique combination of tenderness and flavor because it’s cut from the serratus ventralis muscle beneath the shoulder blade in the chuck primal.
Denver steak combines exceptional tenderness and rich flavor, sourced from the serratus ventralis beneath the shoulder blade.
This specific muscle is less engaged in movement, which results in a tender texture distinct from tougher shoulder cuts.
You’ll notice Denver steak is well-marbled yet leaner than other chuck cuts, balancing fat that melts during cooking to enhance juiciness. It is typically delivered fresh and is suitable for freezing after purchase, ensuring quality and convenience for cooking.
For optimal results, cooking methods such as broiling under a salamander heater can help highlight the steak’s natural flavors.
It ranks as the fourth most tender beef muscle, making it a premium option among chuck steaks.
Expert butchering separates this boneless cut from surrounding connective tissue, yielding a square, trimmed steak ideal for high-heat cooking methods that preserve its succulent quality.
This careful process requires expert knife work to separate the meat from connective tissue, ensuring the tenderness and delicate texture that characterize the Denver steak.
Selecting the Best Denver Steak
When selecting the best Denver steak, you should prioritize cuts that exhibit fine, evenly distributed marbling and a bright red color with firm, white fat. These indicators reflect freshness and superior quality.
Since Denver steak comes from a less used muscle in the chuck primal, it offers exceptional tenderness and juiciness compared to other cuts. Confirm the steak originates from the serratus ventralis muscle within the chuck primal, ensuring ideal tenderness and authentic Denver cut characteristics.
Aim for steaks 1–1.5 inches thick, boneless, with minimal connective tissue for consistent cooking and texture. Proper preparation and cleaning of the meat before cooking are crucial to preserve its quality and flavor.
| Quality Indicator | Ideal Characteristic |
|---|---|
| Marbling | Fine, evenly distributed fat |
| Color | Bright red with firm, white fat |
| Thickness | 1–1.5 inches |
| Muscle Origin | Serratus ventralis (under-blade) |
| Connective Tissue | Minimal visible on surface |
Selecting based on these criteria guarantees superior flavor, juiciness, and tenderness.
Preparing Denver Steak for Cooking

Before you start cooking, it’s really important to pick a Denver steak that has nice, even marbling and a firm texture. This will give you the best flavor and tenderness.
Oh, and don’t forget to trim any excess fat and silver skin! Proper air circulation during cooking can help maintain optimal temperature efficiency.
This little step will help you avoid uneven cooking and keep the steak from becoming tough. For the best results, consider tenderizing the steak with a fork before marinating to enhance its texture tenderizing technique.
Once you’ve cooked your steak to perfection, be sure to slice it against the grain. This simple tip will really help maximize tenderness and keep all those delicious juices locked in. Enjoy your cooking!
Selecting Quality Denver Steak
Since selecting a quality Denver steak directly influences the final taste and texture, you should focus on key attributes like bright red color, firm texture, and well-distributed marbling.
The bright red hue signals freshness and recent butchering, while firmness indicates proper aging. Prioritize steaks with moderate to high intramuscular fat, as it melts during cooking, enhancing juiciness and tenderness.
Proper storage and handling before cooking also help maintain the steak’s optimal freshness.
USDA grades guide your choice: Prime offers the highest marbling, Choice provides balanced quality, and Select is leaner with less flavor. Denver steak is known for its exceptional tenderness, coming from a less-worked muscle that rivals tenderloin in softness.
Denver steaks, cut from the chuck’s serratus ventralis muscle, typically have even thickness around one inch and minimal external fat.
Avoid cuts with discoloration or excessive connective tissue to ensure superior cooking results and rich, buttery flavor.
Trimming and Cleaning Techniques
Selecting a quality Denver steak sets the foundation, but properly trimming and cleaning the cut prepares it for ideal cooking performance.
Begin by removing the tough silver skin that overlays the muscle surfaces, using a sharp boning or trimming knife to avoid sacrificing marbled intramuscular fat essential for flavor and moisture.
Because the Denver steak comes from a less used muscle, preserving the marbling is key to maintaining its renowned tenderness.
Carefully separate the Denver steak along the seams near the blade bone, ensuring no contamination from adjacent chuck muscles.
After trimming, wipe the steak to eliminate loose connective tissue and bone fragments.
Pat it dry to enhance searing and crust development.
Remove any residual sinew on the edges to prevent toughness.
Consistent, coarse then fine trimming shapes the steak evenly, promoting uniform cooking and perfect presentation.
Maintain tool sharpness and work methodically for precise, clean cuts.
Proper Slicing Methods
When preparing your Denver steak for cooking, accurately identifying the grain direction is essential to achieve peak tenderness. The Denver steak, also known as the chuck under blade steak, is prized for its good marbling which contributes to its rich flavor and tenderness.
This marbling helps retain moisture, much like how a well-prepared pizza sauce balances texture and flavor. Locate the long muscle fibers in the serratus ventralis, noting shifts in grain to divide the steak accordingly.
Always slice perpendicular to the grain, using a sharp knife for clean, thin slices that enhance chewability. Rest the steak 3–5 minutes before slicing to maintain moisture and flavor.
Use a stable cutting surface and steady strokes to preserve texture. Adjust slice thickness based on serving style.
| Step | Action | Purpose |
|---|---|---|
| Identify Grain | Observe fiber lines carefully | Ensure perpendicular cuts |
| Portion Steak | Divide where grain changes | Uniform slicing sections |
| Slice Against Grain | Use sharp knife, thin cuts | Maximize tenderness & flavor |
Essential Seasoning Tips for Denver Steak

When it comes to seasoning your Denver steak, don’t be shy! Start by generously sprinkling on some coarse kosher salt and freshly cracked black pepper. This will help ensure that the flavors are evenly distributed throughout the meat.
Now, timing is key here. You want to apply your seasoning just before you cook the steak or after a quick marinade. This little tip really helps to boost the taste and texture.
Because the Denver steak is well-marbled, seasoning and cooking methods can enhance its rich flavor and tenderness.
And if you want to take it up a notch, consider adding some fresh herbs like rosemary or thyme. They bring an aromatic depth that complements the meat wonderfully without overwhelming its natural flavors.
Simple Salt and Pepper
Although seasoning might seem straightforward, mastering the simple salt and pepper application is crucial to unblocking the full flavor potential of your Denver steak.
Use coarse or flaked kosher salt, about 1 teaspoon per pound, to guarantee deep penetration and ideal crust formation.
Pat the steak dry before seasoning, then evenly coat both sides and edges, gently pressing the salt into the surface.
Apply salt at least 45 minutes before cooking to allow proper absorption and moisture extraction, enhancing tenderness and umami.
Add freshly cracked black pepper only just before searing to prevent burning and bitterness.
This balanced salt and pepper combo activates the Maillard reaction, creating a flavorful crust and aromatic complexity, essential for a classic Denver steak profile without overwhelming the meat’s natural flavor.
Because Denver steak typically features remarkable marbling and flavor, this simple seasoning technique allows the fat to melt during cooking and infuse the meat with rich taste.
Timing of Seasoning
Because proper timing unfastens the full flavor and texture potential of your Denver steak, you should apply coarse kosher salt at least 45 minutes before cooking.
This early salting allows the salt to dissolve and penetrate deeply, breaking down muscle proteins and enhancing moisture retention for juiciness.
Denver steak is known for its rich flavor and tenderness when cooked properly, due to its good marbling that contributes to juiciness.
Bring the steak to room temperature for 30-45 minutes before seasoning to ensure even absorption and cooking.
Add aromatics like minced shallots or garlic with salt now, but avoid delicate herbs or sugar-based rubs that burn under high heat.
Apply freshly ground black pepper and heat-prone spices only immediately before cooking to prevent bitterness and burning.
This two-step seasoning maximizes flavor development while protecting the steak’s natural beefiness and ensures an excellent crust during searing.
Enhancing With Herbs
When you enhance your Denver steak with carefully selected herbs, you release layers of flavor that complement its rich, beefy profile.
Use rosemary and thyme for earthy, piney notes that balance the steak’s fattiness. Incorporate oregano or basil to add warmth and a bright, peppery aroma, respectively, which cut through richness without overpowering.
Garlic, fresh or powdered, deepens umami and savory complexity. Adding fresh herbs during cooking can also help retain their nutritional benefits.
Before cooking, it is important to season generously with salt and pepper on both sides to ensure the herbs complement a well-seasoned base. Apply dried herbs in dry rubs before searing, while fresh sprigs work best during the last minutes of cooking or for butter basting.
Butter infused with crushed garlic and fresh rosemary or thyme carries herb flavors evenly across the steak’s surface.
This technique maximizes aroma and taste, enhancing your Denver steak with precision and depth.
Choosing the Right Cooking Equipment
To achieve the perfect sear and consistent doneness on your Denver steak, you’ll need equipment that offers precise heat control and even temperature distribution. A well-seasoned cast-iron skillet excels at high-heat searing and crust formation.
Precise heat control and even temperature are essential for the perfect sear and consistent Denver steak doneness.
A gas grill provides direct heat with adjustable burners for dual-zone cooking.
Non-stick skillets suit beginners but limit crust development. Pellet grills maintain steady high temperatures, and ovens are ideal for finishing after searing.
Key equipment considerations include:
Use heavy-bottomed skillets to avoid hot spots and ensure uniform searing. Preheat grills with the lid closed for 10–15 minutes for ideal temperature.
Employ an instant-read thermometer to monitor internal steak temperature. Choose tongs for flipping to avoid piercing and juice loss. Confirm skillet size accommodates steak without overcrowding for even cooking.
Since Denver steaks come from the shoulder and are known for being tender and well-marbled, selecting equipment that can handle high heat is essential to properly render fat and develop flavor.
Additionally, ensuring your cooking equipment is well-maintained and free of defects helps achieve consistent results and avoids issues similar to those caused by leaky springform pans.
Step-by-Step Pan-Searing Method
First things first, you want to start by patting your Denver steak dry. This step is really important because it helps create that beautiful crust when you cook it.
After that, let the steak sit out for a bit to come to room temperature. This ensures that it cooks evenly throughout. The Denver steak is known for being well marbled, which allows it to cook quickly while staying tender.
Next up, season your steak generously with salt. Don’t be shy with it! Using adjustable speed controls in your kitchen ventilation can help maintain air quality during intense cooking sessions.
Just before you’re ready to cook, add a light coat of oil to the surface of the steak.
Now, it’s time to heat up your cast iron skillet. Make sure it’s preheated so you get that nice, searing effect.
Once your skillet is hot, place the steak in and sear it on both sides until you achieve that deep golden-brown color. It’s all about that perfect sear!
After you’ve got that gorgeous crust, take the steak out and let it rest for a few minutes.
This resting period is key because it allows the juices to redistribute throughout the meat, which means you’ll end up with a steak that’s both tender and packed with flavor.
Preparing the Steak
Although it’s tempting to cook the steak straight from the fridge, you’ll achieve a better sear and even cooking by bringing your Denver steak to room temperature for 30 to 60 minutes.
Start by removing it from packaging and patting it dry thoroughly to eliminate surface moisture.
Next, season liberally with salt and optionally pepper, then lightly coat both sides with a high smoke point oil.
Denver steak is known for its beefy flavor and tenderness, making proper seasoning and searing especially important to highlight these qualities.
Use a heavy skillet preheated to medium-high until just smoking.
Add butter once the pan is hot but not burning.
Place the steak in the pan without moving for 2–3 minutes per side.
Flip gently, add garlic and herbs to infuse flavor.
For thick cuts, finish cooking in a 400°F oven.
These steps optimize crust formation and flavor development.
Cooking and Resting
Once your Denver steak is properly seasoned and your skillet is smoking hot, place the steak carefully in the dry pan to develop a robust crust. It’s important to maintain the skillet’s heat to ensure consistent searing performance.
Sear the first side for 2-3 minutes without moving it. Flip gently with tongs, then add butter, garlic, and herbs; baste continuously for flavor infusion.
For thick steaks, transfer the skillet to a 425°F oven for 2-5 minutes until reaching 130°F for medium-rare. Due to the steak’s extensive marbling, it can be cooked to medium or medium-well without drying out.
Remove and rest the steak loosely tented with foil for at least 5 minutes to redistribute juices. Slice against the grain for ideal tenderness.
| Step | Time (minutes) | Action |
|---|---|---|
| First Sear | 2-3 | Dry pan, no oil, crust forms |
| Flip & Baste | 2-3 | Butter, garlic, herbs added |
| Oven Finish | 2-5 | For thick cuts, 425°F oven |
| Rest | 5+ | Tent with foil, juices settle |
| Slice | – | Against grain, serve immediately |
Grilling Denver Steak for Optimal Flavor
When grilling Denver steak for ideal flavor, you’ll want to preheat your grill to a high temperature, ideally between 450 and 500°F, to achieve a perfect sear that locks in juices and develops a rich crust.
Using a two-zone setup allows you to manage the cooking process efficiently and helps in preserving the steak’s marbling quality. Using a two-zone setup is similar in concept to controlling heat zones in cookware for optimal cooking results.
Use a two-zone setup to manage heat effectively. Before grilling, pat your steak dry and season it generously.
Sear each side for 3–4 minutes over direct heat, then move the steak to indirect heat to finish cooking.
Preheat grill for 10–15 minutes ensuring grate reaches 500°F.
Season steak with salt, pepper, and a light oil coating.
Sear steaks once per side until deeply browned crust forms.
Transfer to cooler side, flipping every 1–1.5 minutes until medium-rare.
Use an instant-read thermometer targeting 125–130°F internal temperature.
Resting and Slicing Techniques
After you’ve achieved the perfect sear and reached your target temperature on the grill, letting the Denver steak rest becomes the next critical step.
Remove the steak about 5°F below your desired doneness, then loosely tent it with foil for 5 to 10 minutes. This resting period allows juices to redistribute, enhancing tenderness and flavor while preventing juice loss when slicing.
The resting period is especially important for Denver steaks because their well-distributed inter-muscular marbling helps retain moisture during this time.
Use an instant-read thermometer to confirm the final internal temperature after resting.
When slicing, always cut against the grain, usually lengthwise, to shorten muscle fibers, improving chewability.
Employ a sharp knife on a stable cutting board for clean, thin slices that preserve texture and juiciness.
Remove the foil before slicing to maintain the crust’s integrity and avoid steaming.
Proper resting and slicing optimize the steak’s balance of crust, tenderness, and moisture.
Creative Sauce Pairings and Serving Ideas
Although Denver steak boasts rich, beefy flavors on its own, pairing it with creative sauces elevates the dish by adding complementary textures and nuanced taste profiles.
The Denver steak, also known as Zabuton, is prized for its tenderness because it is cut from the relatively unused serratus ventralis muscle beneath the shoulder blade, making it ideal for decadent preparations.
You can enhance your steak experience by mastering sauce preparation timing and ingredient balance to maintain ideal temperature and consistency.
Consider these refined pairing ideas:
Gorgonzola cream sauce thickened over 40 minutes, blending crumbled cheese and fresh parsley for a velvety finish.
Peppercorn sauce simmered with beef broth, cracked peppercorns, shallots, and garlic to provide layered heat and umami.
Garlic herb butter pan sauce emphasizing fresh herbs to amplify aromatic complexity without overpowering.
Blue cheese sauce carefully whisked on low heat to preserve smooth, gravy-like texture.
Flake salt finishing and parsley garnish to add contrasting texture and vivid color for presentation.
These techniques ensure your Denver steak serves as a luxurious centerpiece.
Nutritional Benefits and Budget Considerations
Because Denver steak delivers a robust protein content of 21–22 grams per 100-gram serving, it supports muscle growth and repair effectively. It also provides essential micronutrients like iron, zinc, and vitamin B12. These nutrients contribute to oxygen transport, immune function, and nerve health.
Denver steak offers 21–22g protein per 100g, plus vital iron, zinc, and B12 for health support.
Its moderate fat content (11–16g) includes saturated fats, requiring mindful portion control, especially for heart health. The steak is also keto friendly, making it suitable for specific dietary preferences.
Zero carbohydrates make it ideal for low-carb or ketogenic diets.
Nutritionally, it balances bioavailable minerals and vitamins with moderate calories (180–230 per 100g).
Budget-wise, Denver steak offers a cost-effective alternative to premium cuts such as ribeye or filet mignon. It delivers comparable tenderness and flavor.
You can find competitive pricing in supermarkets or local butchers, with bulk purchases increasing value.
This makes Denver steak a smart choice for those seeking quality and economy.
Frequently Asked Questions
Can Denver Steak Be Cooked Sous Vide Before Searing?
Yes, you can cook Denver steak sous vide before searing.
This method guarantees even doneness and tenderizes the meat by breaking down connective tissues at controlled temperatures between 120°F and 130°F for 2 to 4 hours.
After sous vide, pat the steak dry to promote a proper crust. Then sear it quickly in a hot, oiled pan to develop flavor and texture without overcooking the interior.
How Long Can Denver Steak Be Refrigerated Before Cooking?
You can refrigerate Denver steak for 3 to 5 days before cooking, keeping it fresh and safe.
Make sure your fridge stays at or below 40°F (4°C) to slow bacterial growth effectively.
Always store the steak in an airtight container or well-wrapped to prevent contamination.
If you don’t plan to cook it within this window, freeze it to maintain quality for up to 3 months.
Is Denver Steak Suitable for Slow Cooking or Braising Methods?
Yes, Denver steak is perfect for slow cooking or braising because its tough connective tissues break down over low, prolonged heat.
When you cook it slowly at 300-325°F or braise it in flavorful liquids, collagen converts into gelatin, making the meat tender and juicy.
Avoid quick, high-heat methods alone, as they’ll leave it chewy.
Combine slow cooking with a finishing sear for ideal texture and flavor.
Can Denver Steak Be Frozen Without Losing Tenderness?
Yes, you can freeze Denver steak without losing tenderness if you follow proper protocols.
Freezing induces ice crystal formation, disrupting muscle fibers and enhancing tenderness by weakening sarcomere structures.
However, Denver steak’s response varies; it may show moderate tenderness gains.
To preserve juiciness and reduce moisture loss, age the steak before freezing.
Avoid repeated freeze-thaw cycles, as they increase purge and cooking losses, but don’t markedly affect tenderness.
Why This Beef Denver Steak Recipe Deserves a Spot in Your Rotation?
So, you’ve tackled the mighty Denver steak like a seasoned pro—congratulations! If you thought choosing the perfect cut, seasoning it just right, and wielding your grill like a culinary samurai was tough, you’re right.
But hey, nothing says “I’ve got my life together” quite like slicing into a perfectly rested Denver steak. Just remember: overcook it, and you’ll be explaining your “charcoal surprise” to guests.