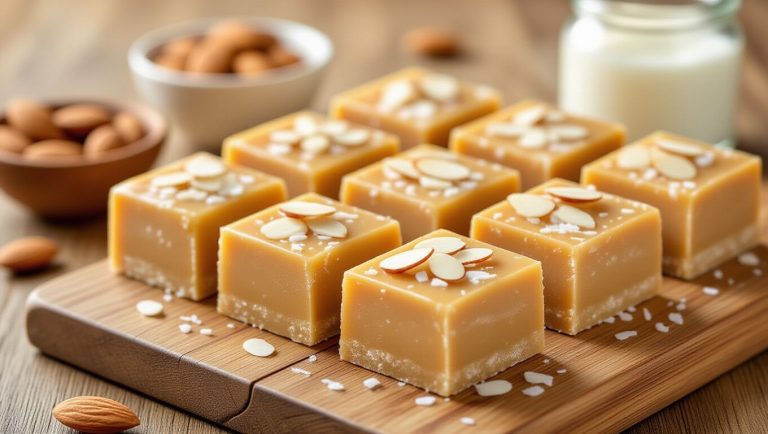
Cookies and Cream Protein Bar Recipe: Step-by-Step Guide
To make cookies and cream protein bars, mix a milk protein blend or egg white protein with oat flour and pre-crushed chocolate cookie bits.
Bind with warmed nut butter, coconut oil, and a low-calorie sweetener like erythritol or monk fruit. Add a white chocolate-flavored cream for signature taste, then press into a lined baking dish and refrigerate to set.
These bars balance texture and nutrition, delivering 13–20 grams of protein. Discover how to perfect texture, flavors, and storage for lasting freshness.
Key Takeaways
- Use a milk protein blend with calcium caseinate and whey protein for a creamy texture and high protein content.
- Incorporate crunchy chocolate cookie bits and white chocolate-flavored cream for authentic cookies and cream flavor.
- Sweeten the bars with low-calorie sweeteners like maltitol and erythritol to maintain sweetness without blood sugar spikes.
- Combine prebiotic fibers such as polydextrose for digestive benefits and improved texture.
- Line an 8×8-inch baking dish with parchment, mix dry and wet ingredients gradually, then set and store bars in airtight containers.
Ingredients Needed for Cookies and Cream Protein Bars
To make cookies and cream protein bars, you’ll need a carefully selected blend of ingredients that balance taste, texture, and nutrition.
Start with a milk protein blend—calcium caseinate, whey protein concentrate, and isolate—to guarantee a high-quality protein source.
Barebells Cookies & Cream protein bars, for example, use a milk protein blend including calcium caseinate, whey protein concentrate, and whey protein isolate to deliver 20 grams of protein per bar.
Sweeten the bars with maltitol and erythritol, both low-calorie sweeteners that maintain sweetness without spiking blood sugar.
For texture and moisture, include glycerin and water. Cocoa butter or its substitutes enhance flavor and mouthfeel. Crunchy chocolate cookie bits and white chocolate-flavored cream provide the signature cookies and cream taste.
You can add vanilla extract or natural flavors for extra depth. Consider prebiotic fibers like polydextrose or soluble corn fiber for digestive benefits. Almonds or plant-based proteins offer healthy fats and alternative protein sources, especially for gluten-free or plant-based preferences.
Step-by-Step Preparation Instructions to Make Cookies and Cream Protein Bar Recipe
To make these delicious, high-protein bars at home, follow the steps below for a perfect blend of taste, texture, and nutrition:
Ingredient Preparation
Although selecting quality ingredients is essential for flavor and texture, you’ll want to start by gathering all necessary components and preparing your baking equipment.
Line an 8×8-inch baking dish with parchment paper to prevent sticking. Measure your protein powder—cookies and cream or vanilla flavor—and flour precisely, using plain or oat flour as the dry base. Oat flour can be made by blending oatmeal until fine, which is a simple way to prepare it at home.
Pre-crumble cookies finely or pulse them in a food processor for even distribution later. Warm nut butters gently to improve mixability, and melt coconut oil to liquid form.
Measure syrups carefully, considering your desired sweetness and binding needs. Optionally, prepare flavor enhancers like vanilla extract.
Finally, combine all dry ingredients in a large bowl before moving on to mixing and binding, ensuring consistent texture and protein content in your bars.
Mixing and Binding
When you combine the binding syrup with the dry ingredients, add the powders gradually while stirring to prevent clumping and confirm even distribution.
Keep the binding syrup heated to about 85°F to improve flowability and ease mixing. Use a stand mixer for thorough integration, especially in larger batches.
Incorporate liquid flavors directly into the syrup for consistent taste throughout. Maintain consistent mixing to confirm the bars hold together well and avoid crumbling.
Key points to focus on:
– Gradual addition of dry powders to syrup
– Maintaining syrup temperature around 85°F
– Using stand mixers for uniform blending
– Adding flavors into the binding syrup
– Controlling moisture with glycerin and sunflower oil This process confirms a homogeneous mix critical for bar texture and stability.
Shaping and Setting
Because shaping and setting directly influence the texture and appearance of your protein bars, you’ll want to use precise methods like extrusion or cold forming to achieve consistent results.
Start by forcing your mixed dough through an extrusion machine fitted with a shaping die to form a continuous bar. This extrusion method is one of the most common bar processing techniques used globally. Then, use ultrasonic guillotine cutters to slice the bars cleanly, minimizing waste and ensuring uniform size.
Maintain strict moisture and temperature control throughout, as these factors affect texture and shelf life. If your recipe includes nuts or dried fruits, cold forming helps preserve their integrity.
Finally, pass the shaped bars through cooling tunnels to solidify coatings and stabilize shape. This precise process guarantees consistent quality, texture, and appearance in every cookies and cream protein bar you produce.
Tips for Achieving the Perfect Texture
Achieving the perfect texture in your cookies and cream protein bars hinges on carefully selecting and balancing ingredients, especially proteins and binders.
Use a blend of whey isolate and plant proteins to balance smoothness and firmness, avoiding dryness. Sticky binders like honey or nut butters enhance chewiness without stickiness. Since texture is important, choosing the right combination of ingredients is essential to meet consumer preferences.
Combining whey isolate with plant proteins and sticky binders like honey creates chewy, moist protein bars without dryness.
Control particle size—finer proteins yield a denser, firmer bar, while larger particles risk crumbliness. Mix gently to prevent excessive air incorporation, ensuring uniform texture and density.
Finally, evenly disperse cookie pieces and creamy elements to maintain consistent texture and moisture balance.
- Blend proteins for ideal softness and cohesion
- Use sticky binders to improve chewiness
- Opt for fine protein particles for uniform density
- Mix carefully to avoid air pockets
- Distribute mix-ins evenly to balance crunch and moisture
Nutritional Benefits of Homemade Protein Bars
Although many store-bought options claim to be healthy, homemade protein bars offer superior nutritional benefits by allowing you to control ingredients and maximize nutrient density.
You can achieve over 30 grams of high-quality protein per 100 g serving using isolates like whey or soy, supporting muscle repair and reducing exercise-induced damage. Including fiber-rich ingredients such as lupine seeds enhances digestive health, glycemic control, and prolongs energy release.
With balanced macronutrients—280–410 kcal, moderate fats, and 21–23 g carbohydrates—these bars sustain energy without excess calories, aiding weight management. This satiety effect is important because protein is the most filling macronutrient, which can help reduce overall calorie intake.
Additionally, homemade bars provide essential vitamins A, D, and E, plus minerals and antioxidants that support immune function and oxidative stress reduction.
Variations and Flavor Enhancements
Customizing your cookies and cream protein bars lets you tailor both nutrition and taste to your preferences. You can switch protein sources to suit dietary needs, like using pea protein for a vegan option or collagen peptides for joint benefits.
Each bar provides 20 grams of protein, making it a convenient way to boost your intake. Operating kitchen appliances efficiently can help save on energy without compromising your cooking routine by considering energy consumption during preparation.
Flavor-wise, adding vanilla extract or cinnamon enhances the classic profile, while texture changes like toasted rice cereal introduce crunch. Reducing sugar is easy with natural sweeteners such as honey or fruit purees.
Consider these additions:
- Swap whey for egg white protein to avoid dairy.
- Mix in cocoa nibs for a chocolate twist.
- Add rolled oats for chewiness.
- Use monk fruit as a zero-calorie sweetener.
- Incorporate chia seeds for omega-3 benefits.
Storage and Shelf Life Guidelines
When you store your cookies and cream protein bars properly, you can extend their freshness and maintain their quality.
Keep them in airtight containers to prevent moisture exposure, which can cause mold or softening. Refrigerate bars for up to 2 weeks, wrapped individually or sealed, to preserve texture and flavor. Each bar contains 13 grams of protein, making them a nutritious snack option.
For longer storage, freeze bars up to 3 months using ziplock freezer bags or meal prep containers, then defrost in the fridge or at room temperature.
Avoid room temperature storage for extended periods due to nut butter oxidation and moisture. Regularly check bars for spoilage, and label containers with dates to manage inventory.
Consistent cold storage and proper handling are key to maintaining shelf life and ensuring your protein bars stay fresh and safe to enjoy.
Frequently Asked Questions
Can These Bars Be Made Vegan or Dairy-Free?
Yes, you can definitely make protein bars vegan and dairy-free by swapping traditional ingredients. Use plant-based protein powders like pea or soy, replace dairy milk with almond or oat milk, and substitute butter with coconut oil or almond butter.
For sweetness, opt for maple syrup or monk fruit. Vegan cookies or homemade dairy-free crumbles can mimic classic flavors, while vegan chocolate enhances taste.
What Is the Best Protein Powder for These Bars?
You want to choose a protein powder that balances taste, texture, and nutrition. Whey protein offers a smooth texture and great flavor but isn’t dairy-free. If you need a vegan or dairy-free option, pea protein works well—it’s hypoallergenic, blends smoothly, and complements sweet flavors.
For keto-friendly bars, whey or collagen protein fits low-carb needs. Combining proteins can also optimize amino acid profiles and bar texture.
How Do Homemade Bars Compare to Commercial Brands Nutritionally?
Isn’t it ironic that commercial bars, marketed as healthy, often hide sugars and preservatives? When you make bars at home, you control what goes in—using natural sweeteners and high-quality proteins. This means your bars usually have less sugar and no artificial additives, fitting your specific nutritional needs better.
Homemade bars offer a cleaner, more authentic nutritional profile, unlike many commercial options that rely on additives to extend shelf life and enhance flavor.
Are These Bars Suitable for Keto or Low-Carb Diets?
You can include these bars in keto or low-carb diets if you watch net carbs carefully. Their total carbs (17–22g) might be high for strict keto, but low sugar and high fiber reduce net carbs, helping you stay within limits.
The high protein content supports muscle maintenance, and sugar alcohols minimize blood sugar impact. Homemade versions let you tailor ingredients, ensuring better carb control for your specific dietary needs.
Can You Freeze the Bars Without Affecting Texture or Flavor?
You can put your bars in the freezer without risking a “texture surprise.” Freezing might make them a bit firmer or chewier, especially if they’ve higher moisture or fat, but the flavor usually stays loyal.
Just wrap them airtight and thaw slowly for the best experience. Avoid repeated freeze-thaw cycles, and you’ll keep both taste and texture nearly intact, making your protein bars a convenient, tasty snack anytime.
Enjoy Your Homemade Cookies and Cream Protein Bars
Now that you’ve crafted your own cookies and cream protein bars, you’ve seen how simple ingredients can deliver both taste and nutrition.
Contrary to the belief that homemade bars lack shelf stability, when stored properly, they maintain freshness for up to two weeks. This proves that with the right method, you don’t have to compromise quality for convenience.
Keep experimenting with flavors and textures—you’ll consistently enjoy a wholesome, satisfying snack made just the way you like it.