Ice Cream in a Mason Jar Recipe: Easy Steps for a Treat
To whip up a delicious ice cream in a mason jar, combine heavy cream, sugar, vanilla extract, and a pinch of salt in a wide-mouth jar.
Shake vigorously for about 5 to 6 minutes until the mixture thickens. Freeze for 3 to 4 hours for the perfect texture. Feel free to customize with fun mix-ins like chocolate chips or fresh fruit. There’s much more to explore, including unique flavor variations and helpful tips.
Key Takeaways
- Combine heavy cream, sugar, vanilla extract, and a pinch of salt in a wide-mouth mason jar for a creamy base.
- Shake the jar vigorously for 5-6 minutes until the mixture thickens and doubles in size.
- Freeze the jar upright for 3-4 hours for solid ice cream, or 2-3 hours for a soft-serve texture.
- Experiment with mix-ins like chocolate chips or fruit for unique flavor variations.
- Enjoy the fun process of making ice cream as a family-friendly activity!
Ingredients for Mason Jar Ice Cream
When you’re ready to whip up a delicious batch of Mason jar ice cream, you’ll need just a few key ingredients to get started.
First, grab some heavy cream; its richness is essential for that creamy texture you crave. Next, you’ll want granulated sugar for sweetness, and a splash of vanilla extract can really elevate the flavor.
To achieve that creamy texture you desire, start with heavy cream, granulated sugar for sweetness, and a hint of vanilla extract.
Don’t forget a pinch of salt to balance everything out and enhance the flavors. For a fun twist, consider optional mix-ins like chocolate chips, strawberry jam, or even peanut butter for extra deliciousness.
You can also explore variations with cocoa powder for chocolate lovers or fresh fruit for a revitalizing touch.
Essential Equipment Needed for Making Ice Cream in a Mason Jar
To create your delightful Mason jar ice cream, you’ll need a few essential pieces of equipment that guarantee both ease and success.
First, choose freeze-proof Mason jars, like Ball Mason Jars, ideally wide-mouth for convenient mixing and serving. Opt for 8-ounce or pint sizes, depending on how much ice cream you want, and make sure each jar has a tight-fitting lid to prevent leaks.
Additionally, using BPA-free materials ensures safe food storage and helps maintain the quality of your ice cream. Next, assess your freezer space; a consistent temperature is vital for achieving the right texture.
If you like, you can use mixing tools like a whisk or an electric mixer for a smoother blend. Just remember to keep everything clean and organized to guarantee a fun and hassle-free ice cream-making experience. Additionally, using a cold environment for mixing helps prevent a chalky texture.
The Shaking and Mixing Process
Below are the simple steps to master the shaking and mixing process for making ice cream in a mason jar:
Shaking Techniques Explained
Shaking techniques play a crucial role in crafting the perfect mason jar ice cream, transforming simple ingredients into a creamy delight.
Start by vigorously shaking your jar for about three minutes; this duration helps prevent a buttery texture. Use a half-pint jar with a wide mouth for easy serving and make certain it’s cold before you begin—this promotes faster thickening.
Keep the lid tightly sealed to avoid air mixing in, which can disrupt the process. Additionally, using a half pint jar ensures that the ice cream freezes evenly, providing a smoother consistency.
Maintain a consistent shaking motion, as this guarantees even thickening without overdoing it. Remember, if shaking isn’t feasible, rolling the jar can also work.
Consistency Check Tips
As you commence your ice cream-making journey, checking the consistency of your mixture is vital to achieving that perfect creamy texture.
Keep these tips in mind during the shaking and mixing process:
- Initial Liquid Stage: Start with a liquid mixture before you begin shaking.
- Desired Thickness: Aim for a consistency similar to brownie or fluffy pancake batter.
- Shaking Completion: You’ll know it’s ready when the mixture thickens and doubles in size.
- Spoon Test: Dip a spoon into the mixture; it should coat the back and drip off easily. Additionally, ensure the mason jar is tightly closed to prevent spills during shaking.
Be cautious not to over-mix, as this can lead to unwanted textures.
Mixing Duration Guidelines
While mixing your ice cream, understanding the duration required for ideal results is essential.
If you’re shaking manually, expect to spend about 5 to 8 minutes vigorously shaking your mason jar until the mixture resembles brownie batter.
This process aerates the cream, creating a luscious texture. Additionally, making ice cream at home is a simple delight that can be enjoyed anytime with minimal effort.
Alternatively, using a hand mixer can greatly cut that time down to just 2 to 4 minutes. Just be careful not to over-whip, as that can turn your creamy delight into butter! For best control, use a single beater on high speed.
Always keep an eye on the mixture’s thickness, and remember, the ingredient temperatures and fat content can influence how quickly your ice cream comes together.
Freezing for the Perfect Texture
To achieve the perfect texture for your mason jar ice cream, it’s essential to pay attention to the freezing process. Follow these tips to guarantee a delightful result:
- Freeze Duration: For a solid consistency, freeze the jars for 3 to 4 hours or overnight. For soft-serve, aim for 2 to 3 hours.
- Shake Before Freezing: Shake the jar for 5 to 6 minutes to thicken the mixture, ensuring a smooth texture.
- Check Regularly: Shake the jar every 30 minutes during freezing to prevent ice crystals from forming.
- Leave Space: Always leave about 1 inch of space at the top of the jar to allow for expansion and avoid lid issues. Additionally, experimenting with various flavors can enhance your ice cream experience.
Flavor Variations and Customization
Whether you’re craving something fruity, nutty, or downright indulgent, customizing your ice cream in a mason jar opens up a world of flavor possibilities.
You can easily create a unique treat by mixing in your favorite ingredients. Here are some ideas to inspire you:
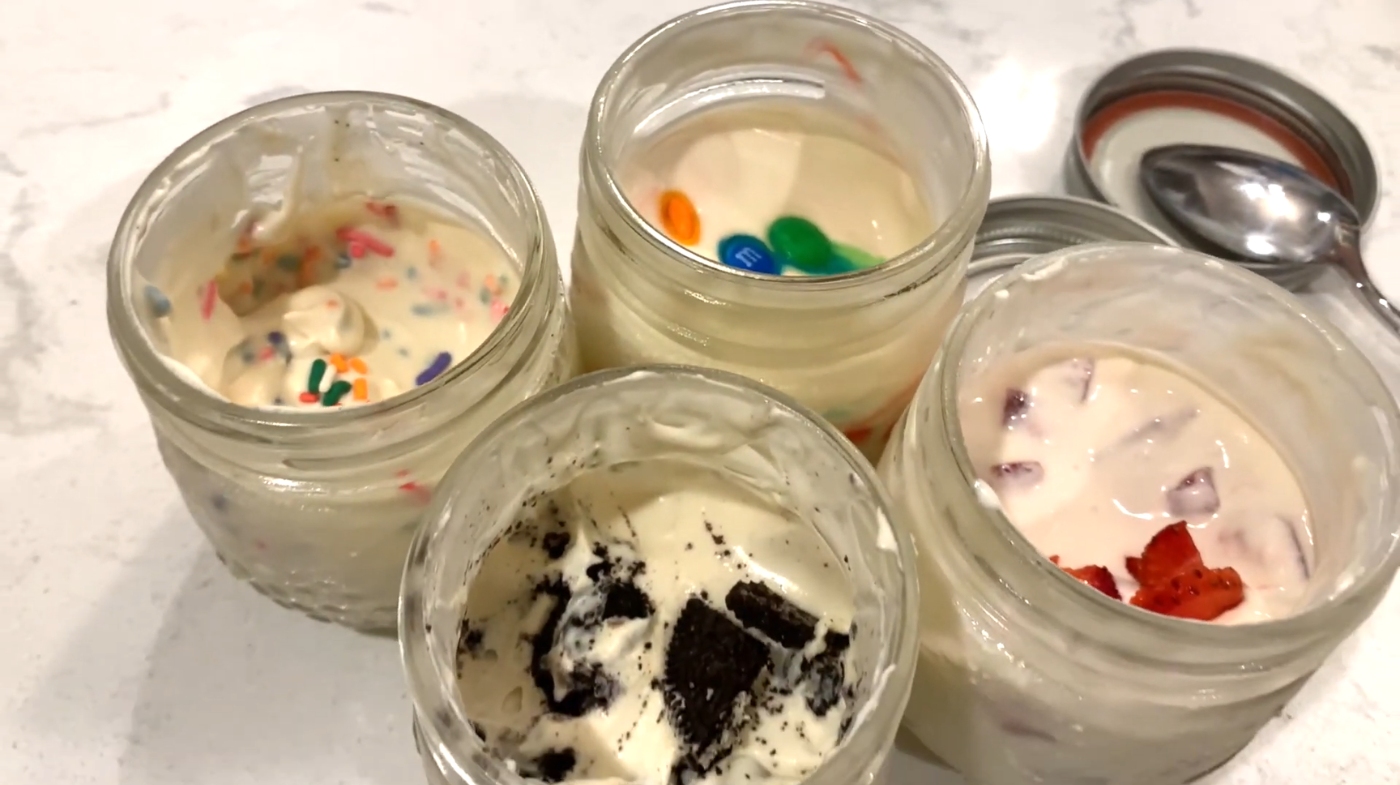
- Strawberry Cookie: Diced strawberries and crushed graham crackers add a delightful twist.
- Mint Chocolate Chip: Just a few drops of peppermint extract and mini chocolate chips make it invigorating.
- Cookies and Cream: A 1/4 cup of crushed Oreos provides a playful crunch.
- S’mores: Mini marshmallows, chocolate chips, and crushed graham crackers recreate that campfire flavor. Wide-mouth jars are also easier for scooping, making your ice cream experience even better!
Frequently Asked Questions
Can I Use Almond Milk Instead of Heavy Cream?
Yes, you can use almond milk instead of heavy cream. It’s a great dairy-free option that cuts down on calories and fat.
Just keep in mind that almond milk has a lighter taste and thinner consistency, so you might want to add a thickening agent like gelatin or cashews for a creamier texture. Don’t forget to adjust the sweetness, as almond milk isn’t as sweet naturally.
How Long Does Mason Jar Ice Cream Last in the Freezer?
Mason jar ice cream lasts about 2-3 months in the freezer, but for the best taste and texture, aim to enjoy it within 3-5 days.
If you notice it becoming harder or icier over time, don’t worry—it’s still safe to eat! Just let it sit at room temperature for 5-10 minutes before digging in.
Can I Make This Recipe Without Any Sweeteners?
Did you know that nearly 70% of people prefer their desserts sweet? If you’re looking to make a recipe without any sweeteners, you can definitely do that! Using sweetened condensed milk provides natural sweetness, but the result mightn’t be sweet enough for everyone’s taste.
Consider adding flavor enhancers like vanilla or blending in fruit purees for extra sweetness without refined sugars. Experimenting with these options can lead to delicious results!
Is It Safe to Shake the Jar Vigorously?
Yes, it’s safe to shake the jar vigorously, as long as you follow a few guidelines. Make certain the lid’s tightly sealed to prevent spills, and use a wide-mouth mason jar for easier handling.
Shake for 3 to 5 minutes to achieve the right consistency, but don’t overdo it—you don’t want a buttery texture. Keep an eye on kids while they shake to guarantee their safety and enjoyment.
What Should I Do if My Ice Cream Is Too Hard?
If your ice cream’s too hard, don’t worry! You can easily soften it. Try placing it in the refrigerator for about 30 minutes. If you’re in a hurry, microwave it on low power for 10 to 60 seconds, checking frequently.
Alternatively, use a warm knife to score the surface, making scooping easier. If you want it softer next time, consider adjusting the sugar and fat ratios or incorporating stabilizers to prevent ice crystals.
Enjoy Your Homemade Mason Jar Ice Cream and Savor the Sweet Memories
Now that you’ve crafted your delightful mason jar ice cream, it’s time to savor each creamy, dreamy bite. Just like the ice cream truck jingling down the street, bringing back those nostalgic summer days, your homemade treat will spark joy in every spoonful.
Remember, the beauty of this recipe lies in its simplicity and customization. So go ahead, whip up your favorite flavors, and make memories that’ll last as long as a timeless song on the radio. Enjoy.

