How to Prevent Springform Pan From Leaking?
To prevent your springform pan from leaking, choose a high-quality pan with a silicone seal or one-piece design. It would be a good idea to inspect the latch and seams for wear. Securely wrap the exterior with 18-inch-wide heavy-duty foil.
Apply non-stick spray, covering sides and bottom uniformly. Line the base with parchment paper for extra protection. Conduct a water test to verify a watertight seal, and consider double-wrapping with foil for added safety.
Avoid overfilling by maintaining at least 1/2 inch from the top. To guarantee a leak-proof baking experience, you’ll want to explore advanced leak prevention methods.
Key Takeaways
- Wrap the springform pan securely with heavy-duty aluminum foil to prevent water from seeping in during a water bath.
- Inspect the pan’s latch and seams for wear or damage that could create gaps and lead to leaks.
- Use a high-quality non-stick spray to create an impermeable layer and prevent leaks.
- Line the base and sides of the springform pan with parchment paper for an additional barrier against leaks.
- Test the pan by filling it with water and checking for any signs of leakage before baking.
Choose the Right Pan
Selecting the right springform pan is essential to prevent leaks during water bath baking. First, prioritize pans with silicone or similar materials that create a solid seal. Silicone can effectively prevent water from seeping into your batter, reducing the risk of leaking. Opt for a one-piece design rather than a pan with a removable bottom, as the latter is more prone to leaks.
Next, verify that your springform pan has a non-stick coating. This feature not only makes it easier to release your cheesecake but also minimizes the chances of leakage by creating a smooth, impermeable surface. Non-stick coatings are particularly useful for maintaining the integrity of the pan’s seal.
Additionally, consider investing in a pan with a built-in watertight seal or one specifically designed for water bath baking. These specialized pans offer an extra layer of protection against leaking, providing peace of mind during your baking process. High-quality springform pans designed for water baths are engineered with leak prevention in mind, making them a worthwhile investment.
Check for Gaps
After selecting the right springform pan, meticulously inspect the latch and seams for any signs of wear or damage that could create gaps and lead to water leakage.
Begin by examining the latch mechanism to confirm it locks securely without any wobbling or misalignment. A compromised latch can cause the pan to lose its tight seal, allowing water to infiltrate the pan during the baking process.
Next, scrutinize the seams where the bottom and sides of the spring-form pan meet. Even a small gap can become a conduit for water when you’re using a water bath. Verify that these seams are tightly interlocked and show no signs of separation or wear. If you spot any gaps, it’s best to address them immediately.
Inspect the non-stick coating for any scratches, chips, or cracks. Damage to the coating can’t only impact the pan’s longevity but also create pathways for water to seep through. A high-quality, durable non-stick coating is essential for preventing leaks.
Use Heavy-Duty Foil
To prevent water from seeping into your springform pan during a water bath, wrap it securely with 18-inch wide heavy-duty foil. Start by placing your springform pan in the center of a large sheet of heavy-duty aluminum foil. Carefully lift the edges of the foil, making certain it covers the pan’s sides completely. Apply pressure to eliminate any air pockets, creating a snug fit around the pan.
If you’re unable to find 18-inch wide foil, use two pieces of 12-inch foil. Overlap them slightly, then fold and crimp the edges together to form a tight seam. This prevents water from entering your springform pan, especially when baking delicate items like cheesecake.
For maximum protection, use multiple layers of foil. Verify each layer is smooth without any seams or overlaps that could create weak points. Press the foil firmly against the pan to maintain a watertight seal. This technique effectively creates a pan within a pan, safeguarding your dessert during the water bath.
Apply Non-Stick Spray
To guarantee a watertight seal, use a high-quality non-stick spray specifically designed for baking.
Spray the entire surface of the springform pan evenly, including the sides and bottom.
Reapply the spray as needed to maintain an effective barrier against leaks.
Choose High-Quality Spray
Selecting a high-quality non-stick spray, such as Pam or Baker’s Joy, provides a robust barrier that prevents your springform pan from leaking.
When you’re preparing to bake a cheesecake in a springform pan, the importance of using a top-tier non-stick spray can’t be overstated. These sprays are specifically engineered for baking applications, creating a uniform, impermeable layer that keeps your cheesecake mixture from seeping out during baking.
Avoid cooking sprays that contain oil or butter, as they may melt at high temperatures, compromising their effectiveness and creating a messy situation.
Instead, always opt for sprays explicitly labeled as ‘non-stick’ or ‘baking-safe’. These specialized sprays guarantee a consistent application, which is vital for maintaining the structural integrity of the spring-form pan and preventing leaks.
To maximize the efficacy of the non-stick spray, verify that your springform pan is completely clean and dry before application.
This allows the spray to adhere evenly, forming a seamless barrier. After spraying, gently wipe out any excess with a paper towel to avoid pooling, which can lead to uneven baking.
Cover Entire Surface
Once you’ve chosen a high-quality non-stick spray, it’s critical to apply it evenly to the entire surface of the springform pan, including the sides and bottom.
Start by holding the non-stick spray can 6-8 inches away from the pan. This distance guarantees an even application without creating puddles or pools of spray. Move the can back and forth in a sweeping motion to coat the entire surface uniformly.
For ideal results, use a non-stick spray that contains flour, often labeled as a baking spray. This type of spray provides a stronger non-stick surface, which is particularly beneficial for cheesecake recipes.
After spraying, let the non-stick spray dry for a few seconds. This brief drying period allows the spray to adhere properly to the pan, enhancing its effectiveness.
Before pouring in the cheesecake batter, inspect the pan to verify there are no excess droplets of spray. If you notice any, wipe them off gently with a paper towel. This prevents the batter from sliding and guarantees an even bake.
Additionally, when using a water bath, wrap the exterior of your spring-form pan with aluminum foil to prevent leakage. Proper application of non-stick spray is essential for a smooth release and hassle-free baking.
Reapply When Necessary
If you notice any signs of sticking or residue on the springform pan, immediately reapply a thin, even layer of non-stick spray to guarantee a seamless baking experience. The integrity of your cheesecake depends heavily on this step.
A properly coated springform pan facilitates easy removal and prevents any potential leaks, especially vital when using a water bath.
To reapply effectively, first confirm the pan is clean and dry. Residual moisture or particles can impede the non-stick spray’s efficacy.
Choose a high-quality non-stick spray specifically designed for baking to create a reliable barrier between the cheesecake and the pan. Hold the spray can about 6-8 inches away and apply a consistent, even layer, covering the bottom and sides thoroughly.
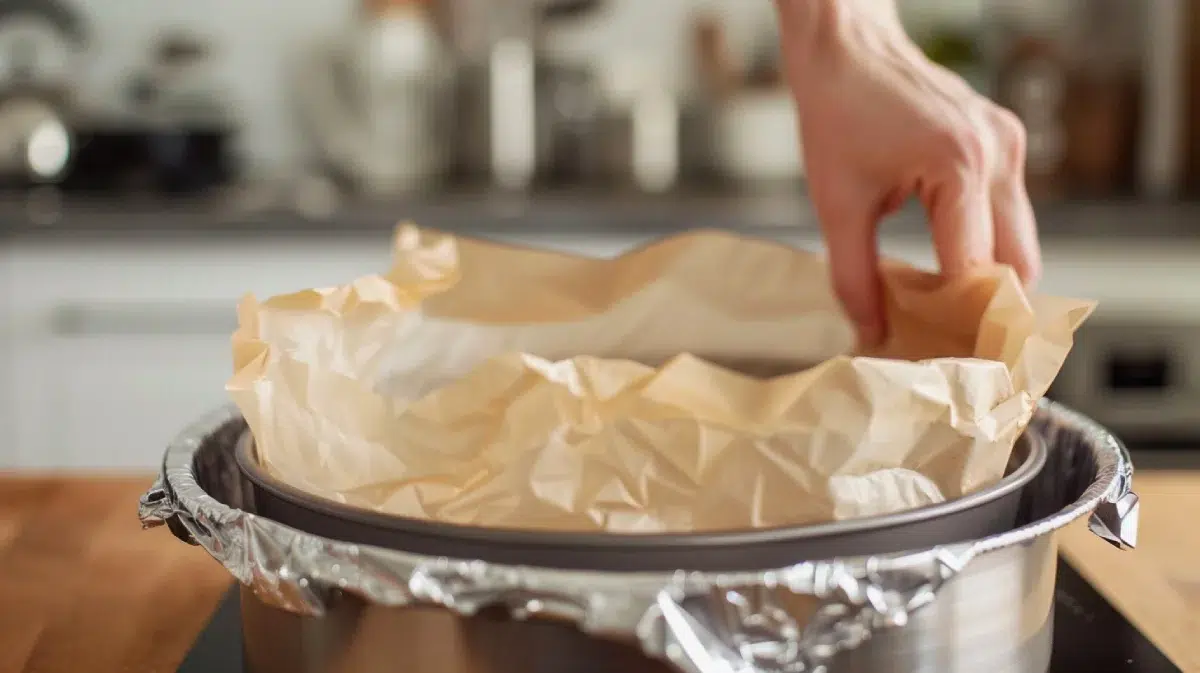
Add Parchment Paper
Lining the base and sides of your springform pan with parchment paper creates an additional barrier against leaks and guarantees an easier release of your baked goods.
Start by cutting a circle of parchment paper slightly larger than the base of the springform pan. Place the parchment paper over the base before securing the ring; this confirms a snug fit. Next, cut strips of parchment paper to line the sides. This dual-layer technique is especially crucial when using a water bath for delicate recipes like cheesecake, as it minimizes the risk of water seeping into the pan.
For added protection, wrap the exterior of the springform pan with a double layer of heavy-duty aluminum foil. This guarantees that even if any liquid escapes the parchment barrier, it won’t penetrate the pan.
Combining parchment paper and aluminum foil creates a robust, leak-proof setup.
Parchment paper not only acts as a sealant but also facilitates easy removal of your cheesecake or other baked goods from the springform pan. This method reduces the likelihood of tearing or sticking, consequently preserving the structural integrity of your culinary creations.
Implement these steps meticulously to achieve professional-level results every time.
Utilize a Silicone Ring
To effectively prevent leaks in your springform pan, start by selecting a silicone ring that matches your pan’s diameter.
Place the ring snugly around the pan to create a watertight seal before wrapping it in foil and situating it in a larger pan for the water bath.
Maintain your silicone ring by washing it in the dishwasher after each use to guarantee long-lasting performance.
Choosing Correct Size
Selecting the correct size silicone ring for your springform pan is crucial to guarantee a watertight seal during water bath baking. The silicone ring needs to be slightly larger than the springform pan to provide a snug fit, effectively preventing leaks.
When choosing the right size, follow these precise steps:
- Measure Your Pan: Accurately measure the diameter of your springform pan. This guarantees you select a silicone ring that’s just slightly larger, providing a tight seal.
- Check Heat Resistance: Opt for a silicone ring that’s heat-resistant, capable of withstanding high oven temperatures without melting or deforming.
- Confirm Food-Grade Quality: Verify the silicone ring is food-grade, guaranteeing it’s safe for baking and won’t introduce any harmful substances to your cheesecake.
- Test the Fit: Before using the silicone ring in a water bath, place it around your springform pan to confirm a secure fit. It should wrap snugly, leaving no gaps where water could seep in.
Proper Placement Tips
After selecting the correct size silicone ring, verify its proper placement by firmly pressing it around the bottom of the springform pan to eliminate any air pockets and create a watertight seal. This step is vital for achieving a leak-proof barrier that withstands the rigors of a water bath. See that the silicone ring is slightly larger than the pan’s base to guarantee a snug fit.
In addition to the silicone ring, you can enhance leak prevention by wrapping the pan’s exterior with foil. This dual-layer approach provides an extra layer of protection against leaks, especially during water bath baking.
Here’s a quick reference table to help you with the process:
| Step | Action | Result |
|---|---|---|
| 1 | Select silicone ring | Slightly larger than pan’s base |
| 2 | Press ring onto pan | Eliminate air pockets |
| 3 | Wrap pan in foil | Extra leak-proof protection |
| 4 | Use water bath | Confidently bake without leaks |
Maintenance and Care
When maintaining your springform pan, make certain the silicone ring is thoroughly cleaned and inspected for any signs of wear or damage before each use. A compromised ring can lead to water seeping into your cheesecake batter during a water bath, spoiling your dessert.
To maintain the longevity and performance of your silicone ring, follow these steps:
- Clean Thoroughly: After each use, wash the silicone ring with warm, soapy water. Avoid using abrasive sponges that can damage the silicone.
- Inspect for Damage: Before every use, check the ring for any tears, cracks, or deformation. Even minor damage can affect its sealing capabilities.
- Proper Storage: Store the ring in a cool, dry place away from direct sunlight, which can degrade the silicone over time.
- Replace When Necessary: If you notice any signs of wear or damage, replace the ring promptly. Silicone rings are affordable and readily available at baking supply stores or online.
Test With Water
Testing your springform pan for leaks is essential to guarantee it performs flawlessly during baking.
To conduct a thorough test, fill your spring-form pan with water up to about 1 inch from the top. This simulates the conditions it will face in a water bath. Let the pan sit for 10-15 minutes, allowing it to reach room temperature to avoid condensation, which could give a false reading.
After the waiting period, carefully inspect the exterior of the pan for any signs of water seepage or droplets. If you notice any leaks, it’s likely due to a faulty pan or improper wrapping. In such cases, consider re-wrapping your pan with foil or using a silicone sleeve to create a watertight seal. Consistent leakage might mean it’s time to invest in a new spring-form pan.
Repeat the test a few times to confirm the pan is consistently leak-free. A successful test indicates that your pan is ready for use in a water bath, but it’s still vital to wrap it properly with foil or a silicone sleeve. This additional step provides an extra layer of protection, guaranteeing your baking endeavors remain uninterrupted by leaks.
Avoid Overfilling
Measure the batter accurately and leave at least 1/2 inch of space at the top to avoid overfilling your springform pan.
This allows for expansion during baking, preventing overflow and potential leaks.
Verify that your pan is at least 2-3 inches deep to accommodate the rising batter effectively.
Measure Batter Properly
To prevent batter overflow and maintain a clean baking process, measure your batter accurately with a digital kitchen scale or a measuring cup, guaranteeing the springform pan is never filled more than 3/4 full. Precise measurement is vital to avoid overfilling, which can lead to batter spilling over during baking and creating a mess in your oven.
Follow these steps to achieve accuracy:
- Use the Correct Tools: Employ a digital kitchen scale for the most precise measurements. Alternatively, use measuring cups, but make certain they’re accurate and suitable for baking.
- Consult the Recipe: Use a recipe specifically designed for your springform pan size. This confirms the batter quantity matches your pan’s capacity, preventing overflow.
- Check Fill Levels: Always leave about 1-2 inches of space between the top of the batter and the rim of the pan. This space allows for batter expansion during baking.
- Double-Check Instructions: Carefully review the recipe’s instructions for filling levels and pan size. Overlooked details can lead to common mistakes like overfilling.
Leave Room for Expansion
Leaving about 1-2 inches of space between the batter and the top of the springform pan is essential for accommodating expansion during baking.
Overfilling your springform pan can lead to overflow, causing batter to seep through the pan’s seams. This not only results in a messy oven but also a soggy cheesecake crust.
To prevent such mishaps, a general rule of thumb is to fill your springform pan no more than 3/4 full. This headspace allows the batter to rise and expand without spilling over.
If you’re using a water bath, which is common for baking cheesecakes, this precaution becomes even more critical. A water bath helps achieve a smooth, even bake by maintaining a consistent temperature, but any overflow can compromise the entire process.
Failing to leave enough space can also cause structural issues. The cheesecake might crack or break apart, making it difficult to remove from the pan without damage.
Double-Wrap for Safety
Double-wrapping your springform pan with heavy-duty aluminum foil creates a secure barrier against water seepage during baking. This method is essential when using a water bath to bake delicate items like cheesecake.
Use 18-inch wide heavy-duty aluminum foil. Narrower foil won’t provide the necessary coverage and can lead to leaks.
Place your springform pan in the center of a large sheet of foil. Fold the foil up and around the sides of the pan, pressing firmly to remove all air pockets. This confirms the foil fits snugly against the pan, minimizing water seepage.
Repeat the process with a second sheet of heavy-duty foil. This extra layer adds another level of protection and greatly reduces the likelihood of any water penetrating the pan.
For added security, place your double-wrapped springform pan inside a slightly larger pan. This added layer helps create an air gap, giving you even more protection against water leakage during a water bath.
Inspect During Baking
Keep a vigilant eye on your springform pan throughout the baking process to catch any signs of leakage early. This proactive approach guarantees that any potential issues can be addressed before they become disasters.
First, place your foil-wrapped pan inside a larger roasting pan before putting it in the oven. This setup will act as a secondary barrier against spills, providing an extra layer of security.
As your dish bakes, periodically inspect the sides of the pan for any drips or seeps. Use a flashlight to get a clear view, especially if your oven’s lighting is insufficient.
Monitor the foil-wrapped pan closely. If you notice any leakage, carefully slide the roasting pan out and re-secure the foil without disturbing the baking process noticeably. Pay attention to hotspots where leaks are more likely to occur, such as the seam of the springform pan.
Additionally, check the oven floor for any signs of leakage that might’ve escaped your initial inspection. If you spot any, place a baking sheet underneath to catch further drips.
Frequently Asked Questions
Why Is My Springform Cake Pan Leaking?
Your springform pan’s leaking because the bottom and sides aren’t sealing properly. Make certain the latch is tight, use high-quality pans, and wrap the base securely with foil. Avoid overfilling the water bath to prevent pressure on seams.
How to Keep Water Out of a Springform Pan?
Coincidentally, you can prevent water seepage by wrapping the springform pan in heavy-duty foil, placing it in a larger cake pan, and ensuring the water level stays below the pan’s bottom. Use parchment paper or a silicone mat inside.
How Do You Keep Water From Seeping in Cheesecake?
To keep water from seeping into your cheesecake, tightly wrap the springform pan in heavy-duty aluminum foil, ensuring no seams. Use a larger cake pan or crockpot liner for additional protection, ensuring a watertight seal.
Can You Use Parchment Paper on the Bottom of a Springform Pan?
Yes, you can use parchment paper on the bottom of a springform pan. Cut a circle to fit, press it into place, and trim excess. Make certain it’s wrinkle-free to facilitate easy removal and prevent sticking.
Celebrate Your Success: Become a Leak-Proof Legend
You’ve mastered the art of preventing springform pan leaks with the precision of a neurosurgeon.
Who knew heavy-duty foil and parchment paper could become your new best friends?
Now, don’t get cocky and overfill that pan, or you’ll be mopping up your culinary ambitions.
Remember, double-wrapping isn’t just for gifts.
And hey, if you miss a leak, at least you’ve got a new hobby: oven cleaning.
Congratulations, you’re now a leak-proof legend!