Can You Sublimate on Glass Mason Jars? Explore the Process
Yes, you can definitely sublimate on glass mason jars! This process allows you to create customized, vibrant designs that stand out. Just make sure your jars have a sublimation coating and that you use the right equipment.
Begin by cleaning the jars and prepping your designs for transfer. With the right techniques and precautions, you can achieve stunning results. If you want to learn more about the step-by-step process and creative ideas, keep exploring.
Key Takeaways
- Yes, you can sublimate on glass mason jars if they have a sublimation coating applied to ensure adherence of designs.
- Clean the glass thoroughly with isopropyl alcohol and remove dust before sublimation to achieve optimal results.
- Use appropriate sublimation equipment, including a sublimation printer and heat press, to transfer designs effectively.
- Choose heat-resistant glass jars to withstand high temperatures during the sublimation process without damage.
- Consider personalized design ideas to make unique gifts, utilizing vibrant colors and creative themes for customization.
Understanding Sublimation and Its Applications
When you think about sublimation, you might picture dry ice transforming directly into gas without a liquid stage. This fascinating process involves a solid absorbing heat, overcoming intermolecular forces, and escaping into vapor.
Not just limited to dry ice, sublimation also applies to substances like iodine. You’ll find it plays a significant role in various applications, such as purifying compounds and freeze-drying.
In fact, sublimation can be used for purifying substances through techniques like vacuum sublimation, enhancing the efficiency of the purification process.
Sublimation isn’t just a scientific curiosity; it’s also used in creating durable, vibrant designs through sublimation printing.
Preparing Glass Mason Jars for Sublimation
Before diving into the sublimation process, you’ll want to confirm your glass mason jars are properly prepared for the best results.
Start by following these essential steps:
Begin with these crucial steps for optimal results in your sublimation process.
- Clean the glass surface with isopropyl alcohol on a lint-free cloth.
- Allow the alcohol to dry completely before proceeding.
- Use a lint roller to eliminate any remaining dust or fibers.
- Confirm your jars have a sublimation coating, like White Oracal 651 Vinyl. Additionally, ensure you are using a 16 oz sublimation-ready glass mason jar for optimal results. This ensures that the glass can withstand the heat required for food preservation during the sublimation process.
- Apply the vinyl to the back of the glass, removing air bubbles with transfer tape.
Types of Glass Mason Jars Suitable for Sublimation
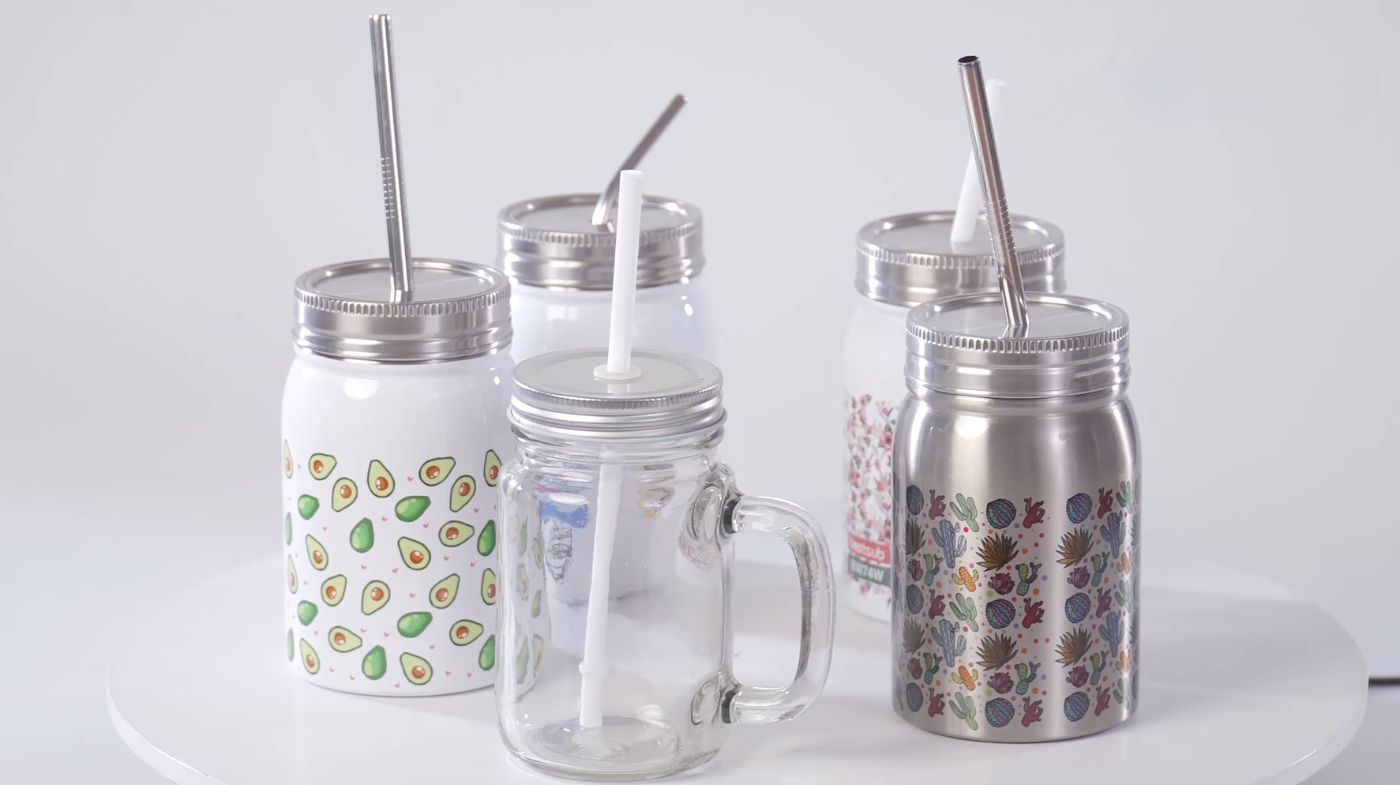
Sublimation on glass mason jars opens up a world of creative possibilities, but choosing the right type of jar is vital for achieving stunning results.
Clear glass jars are popular for their clarity, showcasing vibrant designs beautifully. Frosted glass jars add a unique texture that can enhance your sublimation artwork.
Consider sublimation-coated jars, specifically designed for this process, as they feature a polymer coating that guarantees adherence. Heat-resistant glass is important, too, as it withstands the high temperatures involved.
Specialty shapes and sizes offer flexibility in design, allowing you to create personalized gifts or promotional items. Keep an eye out for jars with smooth surfaces to guarantee even sublimation and maximum results.
Essential Equipment for Sublimating Glass Jars
Creating stunning designs on glass jars requires the right tools and equipment.
To achieve the best results, you’ll need a few essential items:
- Sublimation Printer: A printer compatible with sublimation ink, like Epson models.
- Sublimation Inks: Dye-based inks designed for integration with polymer coatings.
- Sublimation Papers: Coated papers, such as A-sub paper, specifically for glass transfers.
- Heat Press Machine: The key equipment for applying heat and pressure.
- Heat-Resistant Tape: Keeps your sublimation paper securely in place during the process.
Step-by-Step Sublimation Process
Once you’ve gathered your materials and prepared your glass jars, the next step is to plunge into the sublimation process itself.
Start by preheating your heat press to between 350°F and 425°F. Secure your design printed on sublimation paper to the jar with thermal tape, ensuring alignment. Remember to apply poly gloss to your jars before sublimating, as this is crucial for achieving optimal results.
Place the jar in the heat press, applying medium to light pressure. Set the timer for 45 to 180 seconds, adjusting according to your specific jar and coating.
Once the time’s up, carefully remove the jar and let it cool completely before handling. Remember, proper cooling is essential to avoid damage.
Heat Press vs. Oven: Which Method to Choose?
When deciding between a heat press and an oven for sublimating glass mason jars, what factors should you consider? Each method has its advantages, so it’s important to weigh your needs.
- Precision: Heat presses offer better temperature and pressure control. Additionally, using an infrared temperature gun can help monitor the temperature for optimal results.
- Cost: Ovens are typically more budget-friendly.
- Production Volume: Ovens are ideal for larger batches; heat presses are great for smaller quantities.
- Setup: Heat presses are easier to set up and use.
- Flexibility: Ovens handle various item sizes without attachments.
Safety Precautions When Sublimating Glass
Sublimating glass can be a rewarding process, but it’s essential to prioritize safety to prevent accidents and injuries.
Start by wearing heat-resistant gloves to handle hot items. Make certain your workspace is clean and well-ventilated to avoid inhaling fumes. Use a heat press with adjustable settings and apply even pressure, as this helps prevent damage. Additionally, ensure that you are using specific sublimation blanks designed for glass to achieve the best results.
Always clean the glass surface thoroughly, and only use heat-resistant glass with the appropriate sublimation coating. Monitor temperature and time carefully to avoid overheating.
After sublimation, allow the glass to cool naturally, and handle it with care to prevent breakage. Finally, store your sublimated items safely to maintain their integrity and design.
Troubleshooting Common Sublimation Issues
To achieve stunning results with sublimation on glass mason jars, it’s important to address common issues that can arise during the process.
Here are some troubleshooting tips to keep in mind:
- Faded Images: Increase time or temperature for better clarity.
- Blurry Images: Decrease pressing time to avoid over-pressing. Proper sublimation printer settings can also help mitigate this issue.
- Inconsistent Transfer: Verify even pressure and heat distribution.
- Scratch Marks: Wait for the jar to cool before removing transfer paper.
- Temperature Variance: Regularly check your press’s temperature accuracy.
Frequently Asked Questions
Can I Use Regular Glass Jars for Sublimation?
You can’t use regular glass jars for sublimation unless they’ve a special sublimation coating. Standard glass won’t accept the image transfer due to its surface properties.
If you’re keen on sublimating, consider investing in jars designed for this purpose, as they come pre-coated and ready for use.
Alternatively, you could experiment with applying a sublimation-friendly coating to regular jars, but that might require some trial and error to get right.
How Do I Know if My Jars Are Sublimation-Ready?
To know if your jars are sublimation-ready, check for a sublimation coating—look for labels stating they’re specifically designed for sublimation.
Verify the glass is heat-resistant to handle high temperatures. Clean the surface with isopropyl alcohol to remove any oils or dirt. Choose designs with dark colors for better visibility.
Can I Sublimate on Colored Glass Jars?
Can you sublimate on colored glass jars? Absolutely! Just remember, you’ll need a sublimation coating for the colors to show vibrantly.
The heat settings are similar to clear glass, around 400°F, and medium pressure is key to avoid breakage. Choose designs that contrast well with the jar’s color for the best effect.
Cleaning the surface with isopropyl alcohol beforehand guarantees a smooth sublimation process, so don’t skip that step!
What Ink Should I Use for Sublimation Printing?
When you’re choosing ink for sublimation printing, opt for high-quality dye-sublimation inks, especially if you’re working with polyester or poly-coated materials. These inks produce vibrant, long-lasting prints that resist fading and cracking.
If you’re printing on natural fabrics like cotton, go for pigment sublimation inks instead. Always check that your ink is compatible with your sublimation printer to guarantee ideal results in your projects.
How Do I Remove Designs From Sublimated Jars?
When it comes to removing designs from sublimated jars, remember, “a stitch in time saves nine.” Start by cleaning the glass with alcohol and a lint-free cloth.
Then, use a heat gun or convection oven to gently heat the area, which can help lighten the ink. Keep in mind, complete removal mightn’t always happen, but you can re-sublimate with new designs after the surface is prepared.
Sublimate with Confidence: Craft Your Perfect Glass Mason Jar Masterpiece
So, who knew that sublimating glass mason jars could turn you into a crafting wizard? You’ve mastered the art of transforming ordinary jars into personalized treasures.
Just remember, while you’re making those stunning creations, the last thing you want is for your masterpiece to end up as a quirky paperweight. So, stay safe, follow the steps, and let your creativity shine.