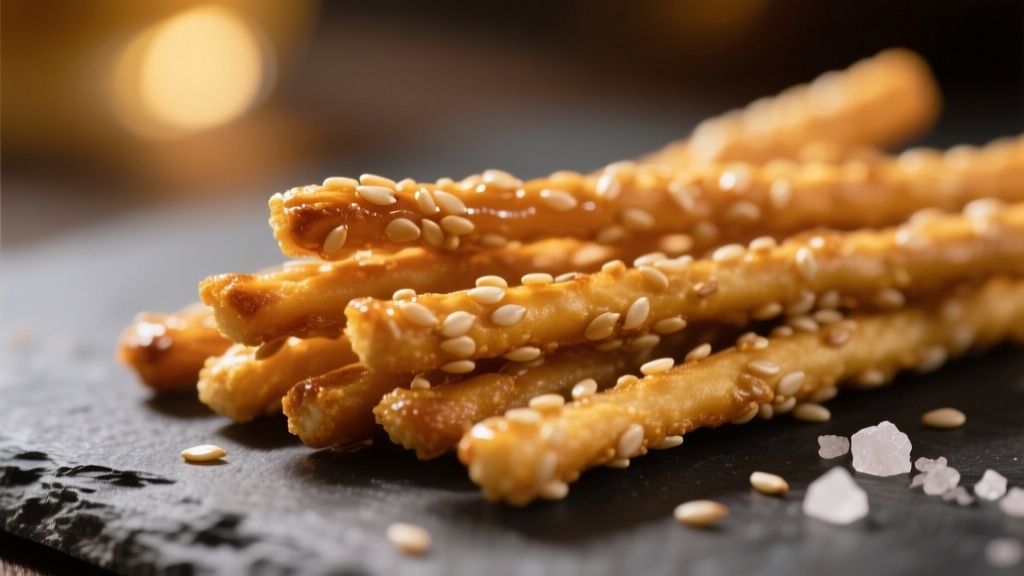
How Do You Make Sesame Sticks? Easy Step-by-Step Guide
To make sesame sticks, first toast sesame seeds until golden to boost flavor. Then mix them thoroughly with dry ingredients like flour and seasonings.
Add wet ingredients, including oils or tahini, and knead into a slightly sticky dough. Roll it evenly to about 1/8–1/4 inch thickness, cut into uniform strips, then bake at 325°F–425°F until crisp.
Store in airtight containers to maintain freshness. Keep exploring to discover expert techniques for perfect texture and shelf life.
Key Takeaways
- Toast sesame seeds until golden to enhance flavor, then mix thoroughly with dry ingredients like flour, turmeric, garlic powder, and salt.
- Combine toasted seeds and dry ingredients with wet components such as tahini, oil, or butter to form a slightly sticky, workable dough.
- Roll dough evenly to about 1/8 to 1/4 inch thickness, then cut into 1/4 inch wide strips using a pizza cutter or sharp knife.
- Bake sesame sticks at 325°F–425°F for 15–30 minutes, flipping halfway, and cool completely on wire racks to ensure crispness.
- Store sesame sticks in airtight containers below 45% humidity and 15–25°C to maintain freshness and prevent moisture absorption.
Recipe at a Glance: Sesame Sticks
| Ingredients / Tools | Steps / Actions |
|---|---|
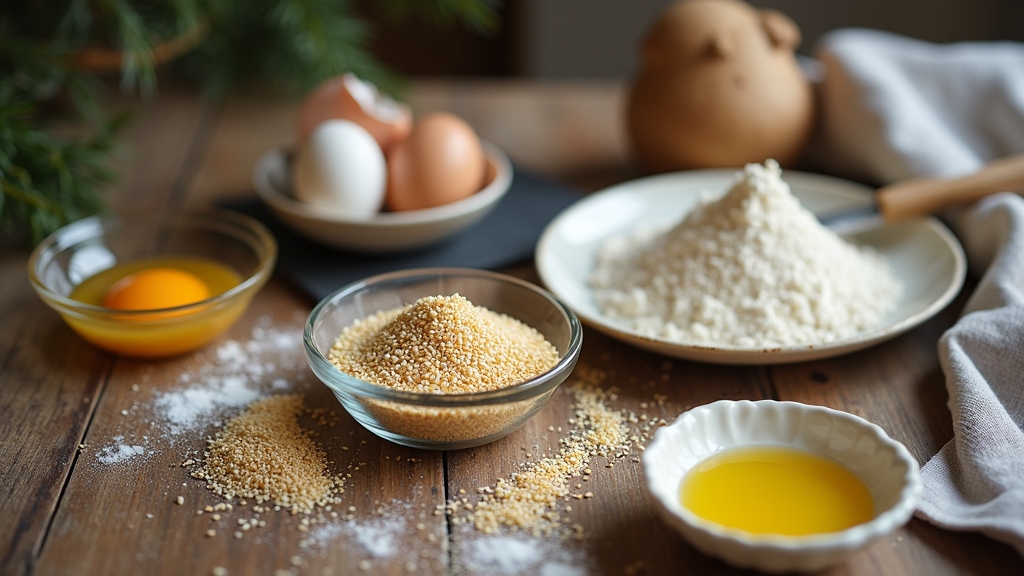
| Sesame Seeds (1 cup) | Toast the sesame seeds over medium heat until golden brown and fragrant. Stir constantly to prevent burning—this step builds the nutty base flavor for your sesame sticks. |
| Flour (2 cups – whole wheat, all-purpose, or blended) | Combine the flour with toasted sesame seeds, salt, turmeric, and garlic powder. Mix thoroughly to form the base for your sesame stick dough. |
| Tahini or Oil (¼ cup) | Add tahini or oil to the dry mix. These ingredients bring moisture and a rich nutty aroma that define classic homemade sesame sticks. |
| Warm Water (as needed) | Gradually pour warm water into the mix, stirring until you get a slightly sticky but pliable dough. This texture ensures your sesame sticks hold together perfectly during baking. |
| Rolling Pin & Cutter | Roll out the dough evenly to about ⅛–¼ inch thickness. Use a pizza cutter or knife to slice into ¼-inch strips—the perfect shape for crisp sesame sticks. |
| Baking Sheet & Parchment Paper | Arrange strips on a lined baking sheet and bake at 325°F–425°F for 15–30 minutes, flipping halfway for even browning and crunch. |
| Wire Rack | Cool your baked sesame sticks completely on a wire rack to preserve their crisp texture. |
| Airtight Containers | Store cooled sesame sticks in airtight jars or bags at 15–25°C (59–77°F) with humidity below 45% for long-lasting freshness. |
Selecting and Preparing Ingredients
When selecting ingredients for sesame sticks, start by choosing the right flour, as it directly affects texture and flavor. Sprouted wheat, whole wheat, and unbleached all-purpose flours are preferred for their unique contributions to the dough’s nutritional profile, nuttiness, and tenderness.
You can enhance texture by blending wheat flour with fine cracked wheat for uniformity. For sesame seeds, toast them over medium-high heat while stirring constantly until golden brown to maximize aroma and flavor before adding them to the dry mix.
Proper preparation and cleaning of ingredients ensure better consistency and quality in the final product. Include dry ingredients like turmeric powder for color, garlic powder for depth, and about one teaspoon of salt for balanced seasoning. Combine these dry elements thoroughly for uniformity.
Selecting appropriate fats, such as sesame oils or cold, cubed unsalted butter, also influences the dough’s pliability and final crispness, essential for quality sesame sticks. Since the original recipe uses a blend of toasted and regular sesame oils, combining both enhances the overall flavor of the dough.
Mixing and Kneading the Dough
Alright, let’s dive into mixing and kneading the dough! First things first, you want to make sure you’re evenly incorporating those sesame seeds into the dough. This step is crucial because it helps ensure that every bite is packed with that delicious flavor and texture.
As you’re mixing, keep an eye on the consistency of the dough. It should have a slightly sticky yet workable texture. This is important because it helps the seeds bind properly. Using the right technique can make the process smoother and more effective for the final product.
If you find that the dough is too dry, don’t hesitate to adjust the hydration a bit during the kneading process. The goal here is to achieve a smooth and elastic dough without going overboard on the water.
For an authentic flavor, many recipes include tahini paste in the dough, which adds a subtle nuttiness that complements the sesame seeds perfectly. Proper preparation and handling of ingredients ensure the best results, similar to preparing appliances carefully before moving.
Seed Distribution Techniques
Although incorporating sesame seeds uniformly can be challenging, mixing them thoroughly with dry ingredients before adding wet components guarantees even distribution throughout the dough. Using a dehydrator sheet can help maintain the dough’s texture if drying or dehydrating is part of your process.
Toasting the seeds prior to mixing enhances flavor and adhesion. Once wet ingredients are added, knead the dough either by hand or with a stand mixer until it becomes sticky and elastic, typically about one minute with a mixer or 50-100 hand kneads.
Use consistent folding and pressing motions to embed seeds without crushing them. Avoid excess flour on your surface to maintain dough stickiness, which is vital for seed adherence. Some seeds may sink or fall off during mixing; aim to incorporate as many as possible.
Pressing seeds onto the dough surface during shaping further ensures an even seed distribution and improved texture in the final product. If the dough feels too crumbly, slightly adjusting the water content can help achieve the ideal consistency for seed incorporation.
Dough Consistency Control
How do you achieve the ideal dough consistency for sesame sticks? Start by mixing dry ingredients evenly before adding warm water (120-130°F) and about one teaspoon of olive oil. Proper hydration is crucial to avoid a crumbly texture and to ensure the dough remains elastic.
Aim for a slightly sticky dough to ensure sesame seeds adhere well and maintain good texture. Use a stand mixer with a paddle attachment for about one minute or hand-knead with 50-100 turns, folding and pressing to develop elasticity without overworking. Similar to cold brew coffee makers with durable materials, choosing the right tools can enhance the quality of your dough.
Avoid excessive flour during kneading to keep moisture balanced. The dough should form a cohesive, elastic ball that’s tacky but not overly wet. If it’s crumbly, add water incrementally.
Rest the dough slightly before shaping to ease handling. This controlled approach guarantees uniform hydration, ideal gluten development, and superior final crispness in your sesame sticks. Incorporating simple, wholesome ingredients during mixing can enhance both flavor and texture.
Shaping and Cutting the Dough
When you’re working with dough, it’s super important to keep that thickness consistent—around 5 mm is usually the sweet spot. Why? Well, it helps with even baking and gives you that nice, crispy texture we all love. Using a tool like a pizza cutter can help maintain this consistency, much like how flush mount lighting ensures even light distribution in kitchens.
So, grab a pizza cutter or a ruler to help you cut those strips about 1/4 inch wide. And don’t be afraid to get a little creative with your shapes! You can try making straight sticks, twisting them up, or even tying them into knots. This flexibility allows you to customize flavors and seasonings to suit your taste.
Just remember to keep those dimensions uniform for the best results, both in texture and presentation. It’s all about finding that balance between creativity and consistency.
Dough Thickness Uniformity
When shaping and cutting dough for sesame sticks, maintaining uniform thickness is crucial to guarantee even baking and consistent texture.
Roll the dough on a lightly floured surface, aiming for a thickness between 1/8 inch (3 mm) and 1/4 inch (6 mm). Use rolling pin guides or calibrated rings to ensure even pressure. It is important to place the dough on a stable surface to avoid any unevenness during rolling.
Avoid overworking dough to prevent uneven thickness. Rest or chill dough beforehand to improve handling and reduce stickiness. Chilling the dough for about 30 minutes firms it up, making it easier to roll out and cut into precise shapes without crumbling, which is essential for dough consistency.
| Thickness Range | Effect on Texture | Recommended Handling |
|---|---|---|
| < 3 mm | Too crispy, may burn | Use rolling pin rings |
| 3-6 mm | Perfect crunchiness | Chill dough before rolling |
| > 6 mm | Dense, undercooked | Roll evenly, moderate handling |
| Uniformity | Even baking & texture | Use tactile and visual checks |
| Correction | Re-roll inconsistencies | Divide dough into portions |
Cutting Techniques Variety
Although rolling the dough to an even thickness is essential, selecting the appropriate cutting technique plays a pivotal role in achieving uniform sesame sticks. Use a sharp knife or pizza wheel to make clean, straight cuts, commonly 1/4-inch by 3/4-inch strips, for consistent shape and baking times.
Employ guides like rulers to maintain uniform width. Before cutting, press sesame seeds onto the dough to ensure even adhesion. Dividing the dough into manageable portions facilitates precise rolling and cutting. Using a stand mixer can make kneading and dividing dough easier and more efficient.
For artisanal variations, hand-roll dough balls into sticks or twist strips to introduce texture and visual appeal. Adjust and trim hand-shaped pieces for uniformity. Keep in mind that varying thickness and shape influences crunchiness and baking duration, so choose your cutting technique based on desired texture and presentation.
Roasting Sesame Seeds and Baking the Sticks
Since sesame seeds continue to cook slightly after removal from heat, you should toast them over medium-low to medium-high heat just until they begin to turn golden brown and emit a nutty aroma.
Use a cast iron skillet or heavy saucepan, stirring constantly for even coloring and to prevent burning.
Toast sesame seeds in a cast iron skillet, stirring constantly to ensure even color and prevent burning.
Once toasted, mix the seeds into the dry ingredients before adding wet components to ensure uniform flavor distribution. This method is important because the recipe also includes ground almonds which complement the toasted sesame seeds perfectly.
When baking the shaped sesame sticks, set your oven between 325°F and 425°F. Lower temperatures require 25-30 minutes with a flip halfway through; higher temperatures need about 15-20 minutes.
Monitor closely to avoid over-browning, especially with thinner sticks. After baking, cool the sticks completely on a wire rack to maintain crispness and structural integrity before storage.
Preparing Syrup or Binding Agents for Variants
How do you choose the right syrup or binding agent for your sesame stick variant? Consider sweetness level, texture, and flavor compatibility. Common syrups like honey, agave, and rice syrup provide effective binding without overpowering flavor; honey also adds moisture but may trigger allergies.
Roasted and salted sesame sticks are often packaged in various sizes, so the choice of binder can be adjusted depending on the scale of production and packaging needs (packaging sizes). Selecting binders that contribute to material durability can also improve the longevity of the product.
For health-conscious variants, natural binders such as date paste or fruit pulps offer fiber and minimal processing. Combine liquid binders with water and vegetable oils (e.g., coconut or sunflower) to improve mixing and mouthfeel.
Incorporate acids or vinegars to enhance binding and subtly adjust flavor. Pay attention to thermal and pH stability to maintain texture through baking. Antioxidant-rich binders help preserve oxidative stability, vital due to sesame lignans. Avoid overly processed commercial gums when aiming for natural formulations.
Packaging Sesame Sticks for Freshness
Choosing the right binding agents affects not only the texture and flavor of your sesame sticks but also their stability during storage.
To maintain freshness, select packaging materials that minimize oxygen, moisture, and light exposure. Vacuum sealing combined with oxygen absorbers can extend shelf life considerably. Since sesame seeds have a high oil content, protecting them from oxidation is crucial to prevent rancidity.
Opt for multi-layer metallized bags or aluminum foil pouches for superior barrier protection. Control humidity below 45% RH inside packaging to prevent mold and texture loss.
| Packaging Material | Barrier Properties |
|---|---|
| Vacuum Packaging | Minimal oxygen exposure |
| Aluminum Foil Pouches | Blocks moisture & light |
| PETE Bottles | Moderate oxygen barrier |
| Multi-layer Metallized | Blocks oxygen & light |
| Cloth Bags | Poor barrier, high humidity |
Use airtight, double-sealed containers and pre-portioned packs to reduce air exchange and prolong crispness.
Storing Sesame Sticks to Maintain Quality
When you store sesame sticks properly, you preserve their crispness and prevent staling by minimizing oxygen and moisture exposure.
Use airtight containers, preferably glass jars with snug lids, to limit oxygen circulation and allow easy inspection. Keep them in a cool, dry place between 15°C and 25°C (59°F to 77°F), avoiding humidity above 45% which promotes spoilage. This temperature range helps maintain consistent temperatures that are ideal for food preservation. Everything sesame sticks are made with high-quality ingredients that benefit from proper storage to maintain their bold flavor.
Add natural desiccants like uncooked rice to absorb residual moisture and employ bay leaves as a natural pest deterrent. Avoid long-term refrigeration to prevent humidity damage.
For extended storage, vacuum-sealing with oxygen absorbers and freezing pre-portioned sticks effectively prolong shelf life. Always label containers with packing date and quantity, rotate stock via first-in, first-out, and regularly inspect for off odors, discoloration, or pests to maintain ideal freshness and quality.
Frequently Asked Questions
Can Sesame Sticks Be Made Gluten-Free?
Yes, you can make sesame sticks gluten-free by substituting traditional wheat flour with gluten-free alternatives like sorghum, brown rice, or tapioca flours.
Use binding agents such as xanthan gum to mimic gluten’s elasticity.
Guarantee all ingredients, including baking powder and sesame seeds, are certified gluten-free.
Carefully avoid cross-contamination by using dedicated equipment and clearly label your products.
This approach maintains texture and flavor while keeping the sticks safe for gluten-sensitive individuals.
What Is the Best Oil for Frying Sesame Sticks?
You should use refined oils with high smoke points like avocado, vegetable, or refined gingelly oil for frying sesame sticks.
These oils prevent breakdown at high temperatures, ensuring crispiness without off-flavors.
If you want to enhance nuttiness, add toasted sesame oil after frying or blend it lightly with neutral oil.
Avoid low smoke point oils to prevent burnt flavors and harmful compounds.
Store oils properly to maintain quality and frying performance.
How Long Do Sesame Sticks Stay Fresh Once Opened?
Sesame sticks stay fresh for about 3 to 6 months once opened if you store them properly. To maximize freshness, keep them in airtight containers away from heat, humidity, and strong odors.
Refrigeration can extend their life beyond six months, especially in warm climates.
Watch for signs like rancid smell, loss of crunch, or mold, which mean it’s time to toss them out.
Are Sesame Sticks Vegan-Friendly?
Yes, sesame sticks are generally vegan-friendly since their core ingredients, wheat flour, soybean oil, sesame seeds, and bulgur wheat, are plant-based.
However, you should watch out for non-vegan additives like honey or animal-derived coatings. Also, cross-contact risks exist if they’re processed in facilities handling dairy or eggs.
To guarantee vegan compliance, check ingredient lists carefully and look for vegan certifications or make them yourself without honey or animal products.
Can Sesame Sticks Be Flavored With Spices After Baking?
Sure, you can spice sesame sticks post-bake, but success stems from surface prepping. You’ll want to lightly mist or brush them with oil while warm to make certain spices stick securely.
Toss them with finely ground powders or herb blends like garlic, paprika, or rosemary for balanced bites. Avoid applying spices on cold, dry sticks to prevent patchy flavor and loss during storage.
Precision in oil and spice amounts guarantees crispness and consistent seasoning.
Store, Share, and Enjoy: Perfect Sesame Sticks Every Time
Just like crafting sesame sticks, where each step from kneading to roasting builds crisp perfection, your efforts shape the final product’s quality.
Think of it as assembling a puzzle; every ingredient and technique fits precisely to create the perfect crunch. Studies show that proper roasting enhances sesame’s flavor by up to 30%, proving precision matters.
By mastering these steps, you guarantee your sesame sticks not only taste great but maintain freshness and texture every time.